Table of Contents
ToggleBuilding a dedicated grill patio turns weekend cookouts from a hassle into an event. A well-designed outdoor grilling space does more than house a barbecue, it creates a hub where family and friends naturally gather. Whether working with a sprawling backyard or a compact side yard, thoughtful layout and purposeful design make the difference between a makeshift setup and a true outdoor kitchen. This guide walks through layout strategies, must-have functional elements, ambiance upgrades, and budget-friendly projects to help homeowners build a grilling patio that works hard and looks great.
Key Takeaways
- Outdoor grill patio ideas should prioritize layout based on available space—linear for small patios, L-shaped for mid-sized yards, and U-shaped or island designs for large spaces.
- Essential design elements include at least 24 inches of counter space on each side of the grill, durable materials like granite or concrete that withstand heat, and weather-resistant storage solutions.
- Strategic lighting and shade features—such as dimmable LED task lights, ambient string lights, and pergolas—extend usability and transform a functional grilling patio into an inviting outdoor living space.
- Budget-friendly DIY projects like concrete paver patios ($300–$600), cinder block grill surrounds ($400), and DIY prep tables ($80–$120) allow homeowners to build functional grilling patios without five-figure investments.
- Place the grill downwind of seating areas and within 20 feet of the kitchen door while maintaining at least 48 inches of clearance in front for safe movement during cooking.
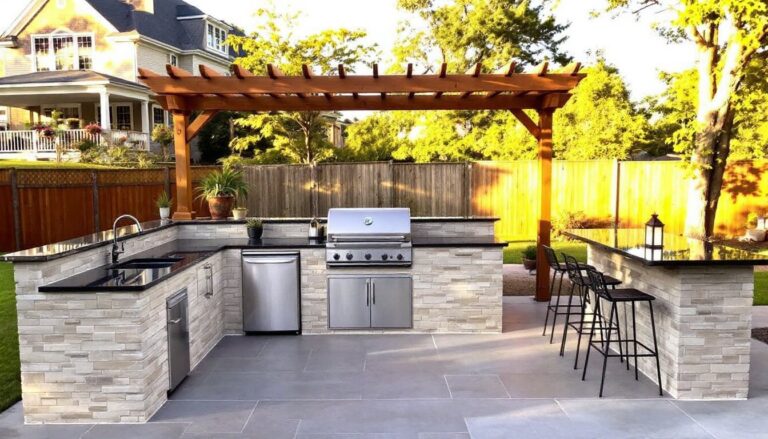
Choosing the Perfect Grill Station Layout for Your Space
Layout determines workflow, safety, and how comfortable guests feel while the cook works. Start by measuring the available footprint and noting any existing hardscape, utilities, or drainage.
For small patios (under 100 square feet), a linear galley layout works best. Position the grill against a fence or house wall with a narrow prep counter on one side. This setup minimizes footprint while keeping tools within arm’s reach. Leave at least 48 inches of clearance in front of the grill for safe movement, code in many jurisdictions requires 36 inches minimum from combustible surfaces.
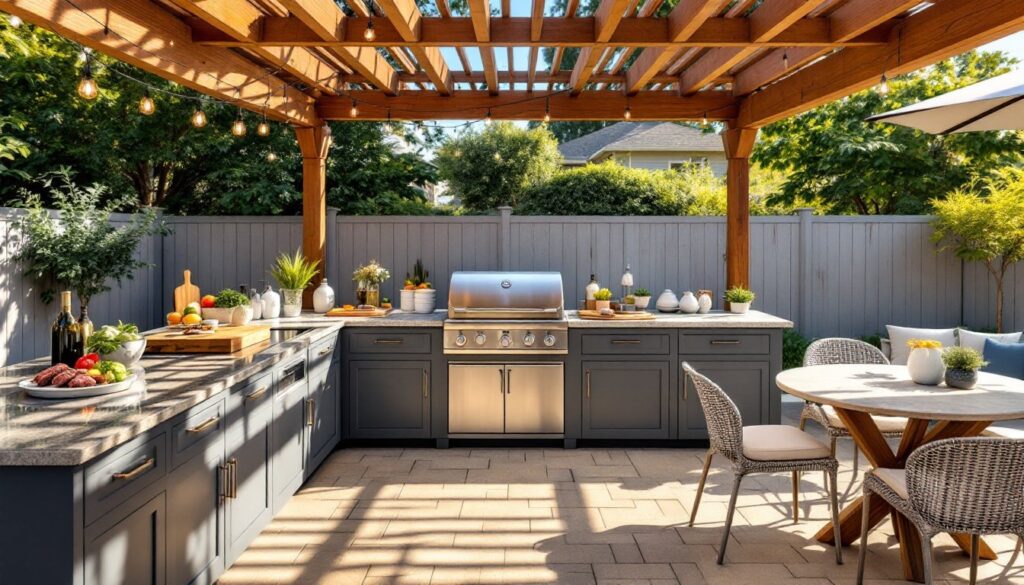
Mid-sized spaces (100–200 square feet) benefit from an L-shaped configuration. Place the grill on one leg of the L and use the perpendicular run for prep counter, sink, or bar seating. This layout naturally separates the hot zone from guest areas. Many homeowners building covered outdoor living spaces integrate an L-shape under a pergola or pavilion for year-round use.
Large patios (200+ square feet) can accommodate a U-shaped or island layout. Islands allow the cook to face guests and create a social hub, but they demand more square footage and require careful utility planning if adding gas, electric, or water lines. Check local building codes, most areas require a licensed plumber for gas hookups and an electrician for 220V outlets.
Regardless of size, place the grill station downwind of primary seating areas to keep smoke away from guests. Position it within 20 feet of the kitchen door to simplify food shuttling. If the site slopes, level the grill pad with compacted gravel and pavers, gas grills especially need stable footing.
Essential Design Elements for a Functional Grilling Patio
A grill patio needs more than a flat surface and a propane tank. Thoughtful design incorporates work zones, storage, and durable materials that hold up to heat, grease, and weather.
Counter Space and Prep Areas
Dedicated prep surface is non-negotiable. Plan for at least 24 inches of counter on each side of the grill, one for raw ingredients, one for cooked food. This separation prevents cross-contamination and keeps workflow smooth during multi-course meals.
Materials matter. Granite, concrete, and porcelain tile handle heat and moisture without warping. Avoid wood counters directly adjacent to the grill: they scorch and absorb grease. If budget allows, specify a honed or leathered finish on stone, it hides fingerprints and water spots better than polished surfaces.
Height should match indoor kitchen standards: 36 inches for prep counters, 42 inches for bar-height seating. Built-in grills often sit slightly lower than freestanding models, so verify rough-in dimensions before pouring footings. Those creating an alfresco dining setup often extend the counter to double as a buffet or serving bar.
Consider adding a sink with hot and cold water. Even a simple outdoor faucet beats running inside every time hands need washing. Frost-proof hose bibs prevent winter freeze damage in cold climates. For full outdoor kitchens, a small prep sink (15–18 inches) fits most budgets and simplifies cleanup. Run drain lines to existing landscape drainage or a dedicated dry well, check local code for graywater requirements.
Storage Solutions for Grilling Tools and Accessories
Clutter kills the vibe. Proper storage keeps tools accessible and protects investments from weather.
Weather-resistant cabinets built from marine-grade polymer, stainless steel, or sealed hardwood provide the best longevity. Standard indoor cabinetry won’t survive a season outdoors, moisture infiltrates particleboard and ruins hinges. Look for 316-grade stainless if near saltwater: 304-grade works fine inland.
Size cabinets to fit actual gear. A two-door base cabinet (30 inches wide) holds a propane tank, charcoal bag, and basic utensils. Add a drawer unit for spice rubs, thermometers, and grill brushes. Install soft-close hinges, outdoor cabinets take abuse, and cheap hardware fails fast.
For DIY builds, consider open shelving with removable bins instead of doors. Plastic or galvanized steel bins protect contents from rain while allowing airflow that prevents mold. Mount shelves under an overhang or inside a grilling pavilion to keep storage dry.
Don’t overlook tool hooks and magnetic strips. Mount them on the grill surround or cabinet sides to hang tongs, spatulas, and meat forks within easy reach. Homeowners exploring outdoor living structures often integrate pegboards or slatwall panels for flexible storage that adapts as tool collections grow.
Creating Ambiance With Lighting and Shade Features
A grill patio that’s only usable at high noon wastes half its potential. Lighting and shade extend usability and elevate the space from functional to inviting.
Task lighting comes first. Install dimmable LED fixtures above the grill and prep counters, aim for 50–75 foot-candles of illumination at work surfaces. Recessed canister lights work well under pergola beams: surface-mount fixtures suit open patios. Choose wet-rated or damp-rated fixtures depending on exposure (wet-rated for uncovered areas, damp-rated under a roof).
Ambient lighting sets the mood. String lights (also called bistro or cafe lights) remain popular for good reason, they’re affordable, easy to install, and create instant atmosphere. Use commercial-grade strings with S14 or G40 bulbs and hang them in gentle curves or straight runs supported by outdoor living structures like posts or pergola beams. Space supports every 8–10 feet to prevent sagging.
Path lighting guides guests safely after dark. Low-voltage LED fixtures along walkways and stairs prevent trips. Solar options work for accent lighting but often lack brightness for high-traffic areas, hardwired 12V systems deliver consistent performance. Check the National Electrical Code (NEC) for requirements on outdoor GFCI protection: most jurisdictions mandate GFCI outlets within 20 feet of water sources.
Shade makes summer grilling bearable. A 10×10-foot pergola covers most grill stations and costs $1,500–$4,000 depending on materials and labor. Pressure-treated lumber offers the best value: cedar and redwood age beautifully but cost more. For DIY builds, use 2×6 rafters spaced 16 inches on center for adequate shade density. Add a retractable canopy or outdoor curtains for adjustable coverage.
Cantilever umbrellas work for smaller spaces or renters who can’t build permanent structures. Choose a model with a 250–300 square inch base filled with sand or water, anything lighter tips in wind. Designs inspired by built-in barbecues often integrate shade directly into masonry surrounds.
Budget-Friendly DIY Grill Patio Projects
Building a grill patio doesn’t demand a five-figure budget. These projects deliver function and style without very costly.
Concrete paver patio remains the most cost-effective foundation. A 10×12-foot pad costs $300–$600 in materials (pavers, base gravel, sand) if installed DIY. Start by excavating 6–8 inches deep, add 4 inches of compacted 3/4-inch crushed stone, then 1 inch of leveling sand. Lay pavers in a running bond or herringbone pattern and sweep polymeric sand into joints to lock everything in place. Rent a plate compactor ($60/day) for proper base compaction, skipping this step leads to settling and uneven surfaces.
For an even simpler approach, pour a 4-inch concrete slab reinforced with 6×6 W1.4×W1.4 welded wire mesh. A 120-square-foot slab costs $350–$500 in materials. Form the perimeter with 2×6 lumber staked every 3 feet, mix bags of 5,000-psi concrete (about 70 bags for 120 square feet at 4 inches thick), and finish with a broom texture for slip resistance. Allow 7 days to cure before placing the grill. Many ideas featured on Southern Living showcase simple concrete patios dressed up with stain or stamped patterns.
Cinder block grill surround creates a built-in look for under $400. Stack standard 8×8×16-inch concrete blocks dry-fitted (no mortar needed for non-structural projects) to form a U-shape around a drop-in grill or kamado. Cap the top course with 12-inch concrete pavers or flagstone for a finished counter surface. This approach works best with heavy grills that don’t shift, secure lightweight units with construction adhesive.
Add a DIY prep table from pressure-treated 2×4s and exterior-grade plywood. Build a simple frame 36 inches tall, sheath the top with 3/4-inch plywood, and cover with peel-and-stick vinyl tile or a sheet of galvanized steel for an industrial look. Apply three coats of exterior polyurethane to wood surfaces. Total cost: $80–$120. Tips from The Spruce often highlight similar budget-friendly outdoor carpentry projects.
Repurposed materials stretch budgets further. Reclaimed brick makes excellent patio paving, check salvage yards or Craigslist for deals. Old butcher block counters, sealed properly, serve as rustic prep surfaces. Metal shelving units from restaurant supply stores make durable outdoor storage for $50–$100.
Conclusion
A well-planned grill patio combines smart layout, functional features, thoughtful lighting, and achievable DIY projects. Whether building a simple paver pad or a full outdoor kitchen, focus on workflow, durability, and creating a space that invites people to linger. With the right approach, any backyard can become the go-to spot for memorable meals.