Table of Contents
ToggleAn open patio offers only seasonal enjoyment, rain, wind, insects, and temperature swings limit how often homeowners actually use the space. Enclosing a patio extends usability well beyond summer, turning square footage that sits empty half the year into a functional room that adds real value. Whether the goal is blocking bugs while keeping airflow, creating a weatherproof dining area, or adding a sunroom that doesn’t require a full addition, enclosed patios offer flexibility that suits different climates, budgets, and skill levels. This guide walks through proven enclosure types, screen, glass, polycarbonate, and three-season structures, plus design strategies that make the space comfortable and code-compliant.
Key Takeaways
- Outdoor enclosed patio ideas range from budget-friendly screen and polycarbonate options to premium glass and three-season sunrooms, each suited to different climates and budgets.
- Screen enclosures provide the most cost-effective way to extend patio usability while blocking insects, working best in mild climates with proper cross-ventilation and maintenance-free aluminum framing.
- Glass enclosures offer weatherproof, climate-controlled living spaces but require structural engineering, building permits, and proper ventilation to prevent condensation and mold in year-round use.
- Polycarbonate panels deliver durability and impact resistance at half the cost of glass, but require UV-protected coatings and careful installation with allowance for temperature expansion.
- Three-season sunrooms with insulated roofs and operable windows extend living space by 3–6 months annually, requiring dedicated electrical circuits, proper footings, and building permits that impact property taxes.
- Success with enclosed patios depends on proper drainage, code-compliant framing, quality materials rated for outdoor use, and matching the enclosure type to your local climate and long-term usage patterns.
Why Enclose Your Patio? Benefits You’ll Love Year-Round
An enclosed patio solves practical problems. Insect control tops the list for most homeowners, mosquitoes, wasps, and flies turn evening meals into battles. A screened or glazed enclosure stops pests without chemical repellents or citronella candles.
Weather protection extends the season. Light rain, wind-blown pollen, and temperature swings become non-issues. A well-designed enclosure can add three to six months of usable time annually, depending on climate zone.
Energy efficiency improves when an enclosed patio buffers the home’s exterior wall. In summer, it acts as a thermal barrier: in winter, it reduces heat loss through windows and doors that would otherwise face the elements directly. Homeowners in USDA zones 6–9 see the biggest gains.
Property value typically increases with quality enclosures. Appraisers and buyers view enclosed patios as finished square footage rather than outdoor hardscaping, especially when structures include electrical outlets, ceiling fans, and proper flooring. The return on investment varies by region, but improvements that add year-round functionality consistently outperform purely decorative upgrades.
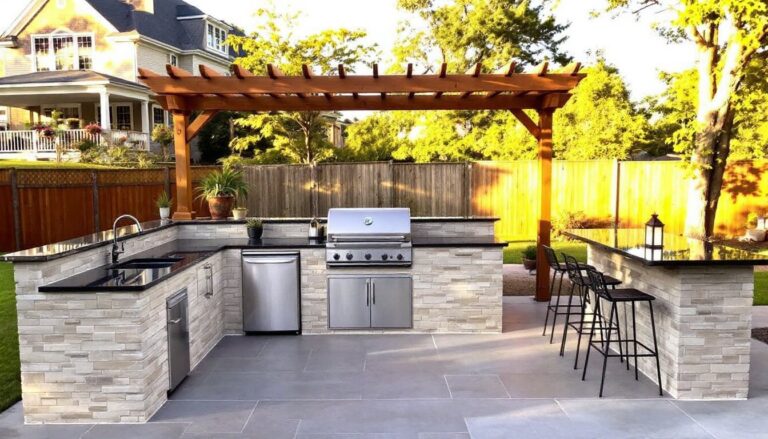
Screen Enclosures: The Perfect Balance of Fresh Air and Protection
Screen enclosures deliver ventilation with bug-free living. They’re the most cost-effective option and work well in mild climates where wind and rain aren’t constant threats.
Materials matter. Standard fiberglass mesh (18×16 weave) resists tears and blocks most insects. For durability in high-traffic areas, upgrade to pet-resistant screening with vinyl-coated polyester: it handles claws and impacts better than fiberglass. In coastal zones, use aluminum or stainless-steel mesh to prevent corrosion from salt air.
Framing options include wood, vinyl, and aluminum. Pressure-treated lumber (rated for ground contact, .40 or higher) works for DIY builds but requires annual sealing. Vinyl frames need no maintenance but can crack in extreme cold. Aluminum extrusions offer the best longevity and accept screen replacement without removing trim.
Installation considerations: Most jurisdictions classify screen enclosures under 200 square feet as non-structural and permit-exempt, but verify local codes. Roof pitches should be at least 3:12 to shed water: flat-screen roofs collect debris and sag. If attaching to the house, lag-bolt the ledger board into wall studs or masonry with 3/8-inch galvanized lags spaced 16 inches on center.
For air circulation, position screened openings on opposite walls to create cross-ventilation. Many homeowners underestimate how much screening allows covered outdoor living spaces to stay comfortable without mechanical cooling.
Glass Enclosures for a Modern, Weatherproof Outdoor Room
Glass enclosures transform patios into climate-controlled extensions of the home. They block wind, rain, and noise while maintaining sightlines, ideal for homeowners who want an outdoor living room feel without full interior construction.
Tempered glass panels are the standard. Minimum thickness is 1/4 inch for fixed panels up to 4×6 feet: larger spans or operable windows require 3/8-inch or 1/2-inch tempered glass. Low-E coatings reduce UV transmission by 60–70 percent, preventing furniture fade and lowering cooling costs.
Sliding glass door systems (multi-panel, bi-fold, or pocket sliders) allow flexible openings. Bi-fold doors stack compactly but cost 30–50 percent more than standard sliders. Pocket sliders disappear into wall cavities, structurally cleaner but require space planning during framing.
Structural requirements escalate with glass. Enclosures often need engineered footings and reinforced framing to handle wind loads and panel weight. Consult a structural engineer if the patio spans more than 12 feet or if local wind speeds exceed 90 mph (coastal or hurricane-prone regions). Most glass enclosures trigger building permits.
Ventilation and condensation management become critical. Without airflow, interior humidity rises, fogging glass and promoting mold. Install ridge vents or powered exhaust fans (rated for outdoor use, minimum 80 CFM per 100 square feet). Add a vapor barrier beneath flooring to prevent ground moisture intrusion.
Glass enclosures work best in temperate climates. In regions with extreme winters, supplement with insulated panels or removable storm windows. According to designers featured on Gardenista, layering seasonal enclosure options keeps costs manageable while maximizing year-round comfort.
Polycarbonate Panels: Budget-Friendly and Durable
Polycarbonate panels offer a middle ground between screen and glass, weatherproof, impact-resistant, and half the cost of tempered glass. They’re practical for DIYers willing to work with unfamiliar materials.
Panel types include multiwall (twin-wall or triple-wall) and corrugated. Multiwall panels have internal ribs that provide insulation (R-value of 1.5–2.0 for 8mm twin-wall) while diffusing light. Corrugated panels are thinner, cheaper, and better for roofing applications where light transmission matters less.
UV protection is essential. Uncoated polycarbonate yellows and becomes brittle within 2–3 years. Specify panels with co-extruded UV coating on the exterior face, 10-year warranties are standard. Avoid adhesive-applied coatings: they peel.
Installation tips: Polycarbonate expands and contracts significantly with temperature. Use oversized holes (1/8 inch larger than fastener diameter) and neoprene washers to allow movement. Fasten with self-drilling screws designed for polycarbonate, standard wood screws crack the material. Seal panel edges with aluminum U-channel or polycarbonate H-profiles to prevent dirt and insect infiltration.
Roofing considerations: Slope polycarbonate roofs at least 5:12 to prevent standing water and ensure the ribbed channels run vertically for drainage. Attach panels to purlins (2×4 or aluminum extrusions) spaced 24 inches on center. Flash the connection where panels meet the house wall with step flashing and silicone sealant.
Polycarbonate dims over time but handles impacts (hail, falling branches) better than glass. It’s the go-to for homeowners who need outdoor living structures that withstand weather without constant upkeep.
Three-Season Sunrooms: Extending Your Living Space
Three-season sunrooms bridge outdoor and indoor living. They include insulated roofs, full-height walls, and operable windows but typically lack the HVAC integration required for year-round use in harsh climates.
Foundation requirements vary. Frost-protected shallow foundations (FPSF) work in many regions and cost less than full-depth footings. Alternatively, build on an existing concrete patio slab if it’s at least 4 inches thick with 6×6 W1.4×W1.4 welded wire mesh reinforcement. Verify the slab is level within 1/4 inch per 10 feet, out-of-level slabs cause door binding and water pooling.
Wall systems for three-season rooms use 2×4 or 2×6 framing with insulated panels or a mix of fixed glass and insulated sections. Many manufacturers offer pre-engineered kits with extruded aluminum framing and snap-in glass panels. Kits simplify installation but limit customization.
Roofing typically involves insulated panels (polyurethane or polystyrene core with metal skins) or a conventional shingled roof over rafters and sheathing. Insulated panels install faster but show fastener heads unless covered with trim. Shingled roofs match the main house aesthetically and provide better sound dampening during rain.
Electrical and HVAC: Three-season rooms generally require dedicated circuits for lighting and outlets. Run 12-2 NM-B cable (or weatherproof conduit if local code requires) from the main panel. Install GFCI-protected outlets within 6 feet of any water source (if adding a sink or wet bar). For heating, electric radiant floor mats or ductless mini-split heat pumps work well without extending the home’s central HVAC.
Permitting: Expect building permits, inspections, and possible impact on property taxes. Three-season sunrooms count as conditioned space additions in most jurisdictions. Budget for permit fees (typically $200–$800) and plan for 2–4 inspections (footing, framing, electrical, final).
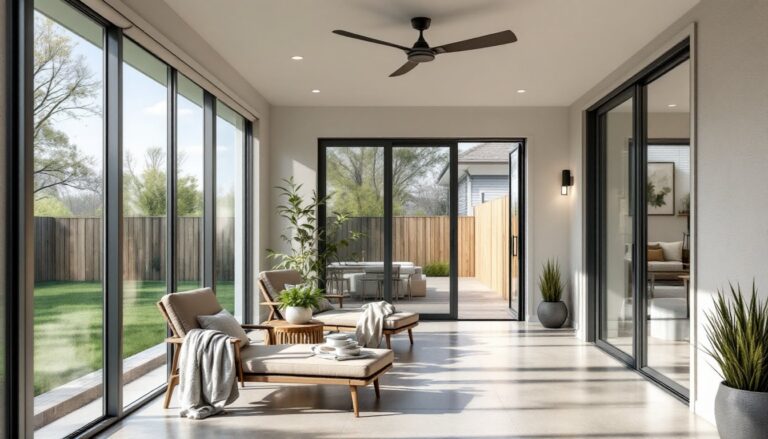
Design Ideas to Maximize Comfort and Style
Functionality drives design in enclosed patios. Start with flooring. Concrete stain or epoxy coatings suit high-traffic areas and resist moisture. Porcelain tile (rated for outdoor use, minimum PEI rating of 4) handles freeze-thaw cycles better than ceramic. For warmth underfoot, use interlocking composite deck tiles over the existing slab, they install without adhesive and allow drainage.
Lighting should include multiple layers. Recessed LED downlights (IC-rated if installed in insulated ceilings) provide general illumination. Add wall sconces or pendant fixtures for task lighting near seating or dining areas. Use dimmable LEDs (minimum 90 CRI for accurate color rendering) to adjust ambiance. Install fixtures on separate switches or a smart dimmer system.
Furniture and fabrics need to handle humidity. Teak, aluminum, and all-weather wicker resist warping. Cushions should use solution-dyed acrylic fabrics (Sunbrella or equivalent) with open-cell foam that drains water. Store cushions indoors during extreme weather.
Ceiling fans improve comfort year-round. Choose outdoor-rated models (UL 1598 wet or damp location, depending on enclosure type) with reversible motors, counterclockwise in summer for cooling downdraft, clockwise in winter to recirculate warm air. For standard 8-foot ceilings, use flush-mount or hugger fans: for vaulted ceilings, downrods keep blades 8–9 feet above the floor.
Window treatments control light and privacy. Exterior roller shades block heat before it enters the space, more effective than interior treatments. Cellular shades add insulation in three-season rooms. Avoid wood blinds: humidity causes warping.
Many regional design trends, highlighted by publications like Southern Living and Better Homes & Gardens, emphasize natural materials and layered lighting. Applying those principles to enclosed patios creates a seamless transition from indoor to outdoor spaces.
Conclusion
Enclosing a patio converts underused outdoor space into a functional room that earns its square footage. Screen enclosures suit mild climates and tight budgets, glass delivers weatherproof performance with full visibility, polycarbonate offers impact resistance at mid-range cost, and three-season sunrooms provide near-indoor comfort. Success depends on matching the enclosure type to climate, usage patterns, and building codes. Proper prep, footings, drainage, framing, prevents the common failures that turn DIY projects into contractor callbacks. With accurate planning and realistic expectations, an enclosed patio delivers years of comfortable, pest-free living.