Table of Contents
ToggleCinder blocks aren’t just for foundation walls and retaining structures. These affordable, fire-resistant masonry units, officially called concrete masonry units or CMUs, make excellent building material for outdoor kitchens. At roughly $2–$4 per block, they offer structural strength and heat resistance that wood-framed islands can’t match. A standard 8×8×16-inch block (actual dimensions: 7⅝×7⅝×15⅝ inches) weighs about 38 pounds and can support the weight of stone countertops, built-in grills, and heavy tile finishes. Whether a homeowner is planning a simple grill surround or a full cooking station with storage and bar seating, cinder blocks provide a forgiving, modular foundation that doesn’t require advanced masonry skills.
Key Takeaways
- Cinder block outdoor kitchen ideas offer a cost-effective alternative to prefab options, with materials running just $120–$320 for a basic grill island compared to $800–$2,000 for stainless steel carts.
- Cinder blocks are non-combustible, moisture-resistant, and fire-code compliant, making them ideal for safe outdoor kitchen construction without special heat shields.
- Proper planning—including permit verification, utility location checks, and accurate material calculations—is essential before building, particularly for designs with gas lines or electrical connections.
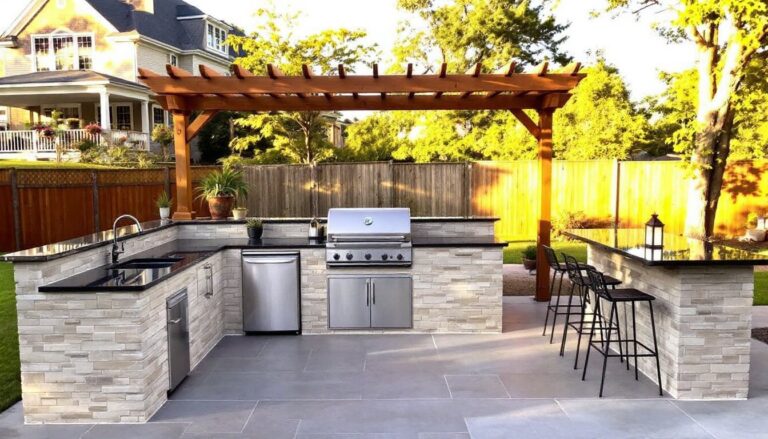
- L-shaped cinder block layouts maximize functionality by combining grill space with prep areas, storage, and room for sinks or refrigeration.
- Multiple finishing options—stucco, tile, stone veneer, or paint—allow homeowners to customize the aesthetic from industrial to Mediterranean without premium costs.
- Built-in storage, durable countertops (tile, concrete, granite, or natural stone), and attention to proper footing ensure a cinder block outdoor kitchen lasts for decades.
Why Choose Cinder Blocks for Your Outdoor Kitchen?
Cinder blocks check nearly every box for outdoor construction. They’re non-combustible, meeting fire safety codes for grill enclosures without requiring heat shields or standoffs. They resist moisture, insects, and UV degradation, unlike pressure-treated lumber that can warp or rot over time.
Cost is another advantage. A basic straight-run grill island measuring six feet long might require 60–80 blocks, totaling $120–$320 in materials before mortar and finishing. Compare that to a prefabricated stainless steel cart at $800–$2,000, and the savings become clear.
The modular nature of CMUs makes layout flexible. Mistakes are easier to correct during dry-fitting, and adding height or width later is straightforward. Hollow cores can be filled with rebar and concrete for added strength if the structure will support heavy granite or concrete countertops, important in seismic zones or where frost heave is a concern.
Finally, cinder blocks accept most finishes. Homeowners can leave them raw for an industrial look, apply stucco for a Mediterranean vibe, or attach stone veneer to mimic natural masonry. That adaptability appeals to builders who want a custom aesthetic without custom pricing.
Essential Planning Steps Before You Build
Start with local building codes and permits. Many jurisdictions classify outdoor kitchens with permanent gas or electric connections as structures requiring permits, especially if they’re attached to the home or exceed a certain square footage. Gas line work typically requires a licensed plumber, and electrical runs must meet National Electrical Code (NEC) standards, usually GFCI-protected outlets on a dedicated 20-amp circuit.
Choose a level site at least ten feet from the house if using a grill, per most fire codes. Check underground utilities before digging footings: call 811 for a free locate service. A 4-inch gravel base topped with 4 inches of concrete makes a stable slab for the structure, though some builders skip the slab and build directly on compacted gravel in mild climates. Consult a structural engineer if the kitchen will be large (over 8 feet long) or support heavy loads.
Sketch the layout to scale on graph paper. Standard built-in grills range from 24 to 42 inches wide and need 6 inches of clearance on each side. Plan counter space of at least 18 inches on one side for plating and prep. Add a second run perpendicular to the grill if the design will include a sink or refrigerator, both require utility hookups and drain lines.
Measure twice, order once. Calculate block quantity by drawing each course (row) on the plan. Don’t forget half blocks and cap blocks for the top course. Order 10% extra to cover breakage.
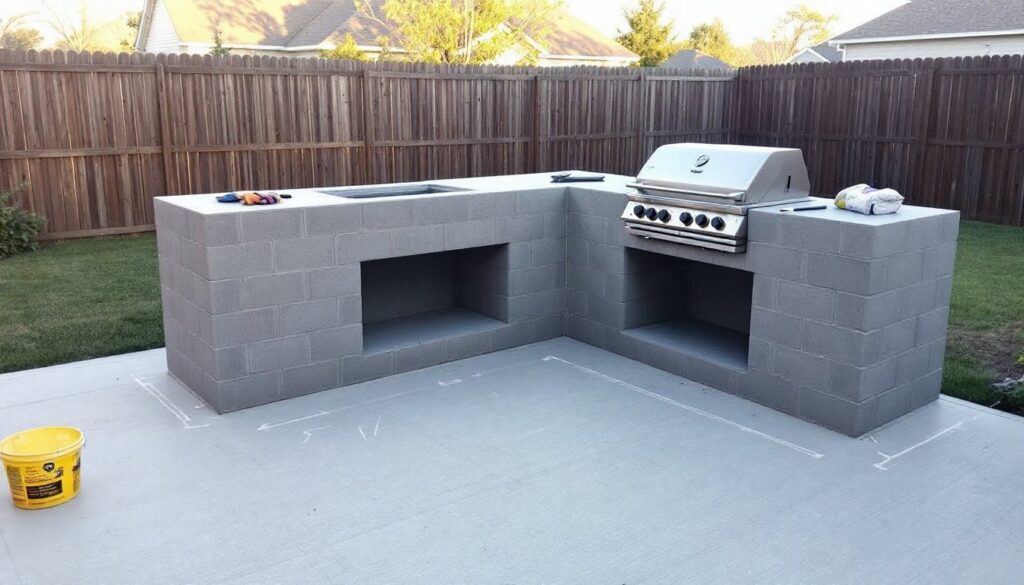
Classic Cinder Block Grill Station Design
A straight-run grill station is the simplest build and works well in narrow yards. The structure is essentially two vertical piers flanking a grill, connected by a top course that supports the countertop.
Materials List:
- 60–80 standard 8×8×16-inch cinder blocks
- 2 bags of Type S mortar mix (or use construction adhesive for a dry-stack approach)
- Rebar (½-inch diameter) and concrete fill for cores if codes require
- Built-in grill unit or grill insert kit
- Countertop material (tile-over-concrete-board, granite, or poured concrete)
Step-by-Step:
- Lay the first course dry to confirm spacing. The grill should fit snugly between piers with minimal gaps. Mark block positions with chalk or paint.
- Mix mortar to a peanut-butter consistency. Spread a ½-inch bed on the slab and lay the first course, checking level in both directions after every three blocks.
- Stagger joints (running bond pattern) so vertical seams don’t align. This adds strength and looks cleaner.
- Build up four to five courses for a 30–36-inch cooking height. Insert rebar vertically through cores every 16 inches if filling with concrete.
- Set the grill frame on the piers. Most inserts have a flange that rests on the blocks: secure with mortar or high-temp construction adhesive.
- Add cap blocks or a top course with the cores facing down for a flat surface. Trowel smooth.
- Install the countertop after mortar cures (48–72 hours). Use thinset mortar for tile or bolt down stone slabs.
Safety note: Wear gloves and safety glasses when cutting blocks with a masonry blade. Use a wet saw or circular saw with a diamond blade for clean cuts. Dust masks are essential, silica dust is a respiratory hazard.
L-Shaped Outdoor Kitchen Layout
An L-shaped layout turns a corner of the patio into a full work zone, adding prep space, storage, and room for a side burner or sink. This design works especially well when extending an outdoor living space that already includes seating or dining areas.
The long leg typically houses the grill, while the short leg provides counter and cabinet space. Plan the short run at least 36–48 inches long to accommodate an undermount cooler or trash pullout.
Construction Tips:
- Dry-stack both legs first to visualize proportions. Adjust lengths before mortaring.
- Use corner blocks or cut standard blocks to create a clean 90-degree turn. Some builders miter-cut the corner blocks at 45 degrees for a decorative detail.
- Frame openings for cabinet doors or drawers by leaving gaps in the block courses. Span openings with steel lintels (angle iron works) if the gap exceeds 24 inches.
- Tie the two legs together structurally by filling corner cores with rebar and concrete. This prevents racking if one leg is taller or carries more weight.
- Add a bar overhang on the outer edge of the short leg if space allows. A 12-inch overhang provides knee room for bar stools: support it with steel brackets or a cantilevered countertop design.
Consider running electrical conduit and plumbing through the hollow block cores during construction, especially for designs incorporating a sink, beverage fridge, or task lighting. Outdoor living room designs often integrate lighting to extend usability into the evening.
Finishing Touches: Stucco, Tile, and Stone Veneers
Raw cinder block has its fans, but most homeowners prefer a finished look. Stucco is the most budget-friendly option. A three-coat system, scratch coat, brown coat, and finish coat, runs about $3–$6 per square foot in materials. Apply over metal lath fastened to the blocks with masonry screws. Stucco bonds well to CMUs and can be tinted or textured to match the home’s exterior.
Tile offers endless design options. Large-format porcelain tiles (12×24 inches or larger) minimize grout lines and speed installation. Use exterior-rated thinset mortar and grout: interior products will crack in freeze-thaw cycles. Prep the block surface with a skim coat of mortar if the joints are recessed. Budget $8–$15 per square foot for mid-grade tile and supplies.
Stone veneer, either natural or manufactured, delivers a high-end look for $10–$25 per square foot. Ledger stone and stacked stone are popular choices and install with mortar and a moisture barrier. Natural stone weighs more: confirm the footing can handle the load. Manufactured stone (cast concrete with pigment) weighs half as much and comes in modular panels for faster coverage, as featured in some low-cost kitchen designs using concrete block construction.
Painting is the quickest finish but requires a masonry primer and exterior-grade acrylic paint. Expect to repaint every 3–5 years in sunny or wet climates. Fill deep mortar joints with caulk or thin mortar first for a smoother surface.
No matter the finish, seal the countertop and any horizontal surfaces with a penetrating sealer to repel water and stains. Reapply annually or per manufacturer recommendations.
Adding Built-In Storage and Countertop Options
Built-in storage transforms a grill surround into a functional kitchen. Frame openings during the block-laying stage, then install marine-grade polymer or stainless steel cabinet doors. Wood doors look great but require regular sealing in humid climates. Builders should avoid standard indoor cabinetry, it won’t survive moisture and temperature swings, a point frequently discussed on sites like Bob Vila when covering outdoor projects.
Drawer boxes can be DIY-built from PVC trim board or purchased as weatherproof inserts. Use stainless steel drawer slides rated for outdoor use. Pullout trash cans and propane tank storage are smart additions: just ensure adequate ventilation around gas bottles per fire codes.
Countertop choices impact both budget and maintenance:
- Tile over concrete backer board: Cost-effective ($6–$12/sq ft) and customizable. Use bullnose edge trim for a finished look.
- Poured concrete: Durable and modern ($15–$30/sq ft for DIY with forms and mix: double that for pros). Requires sealing.
- Granite or quartz slabs: Premium appearance and minimal upkeep ($50–$100/sq ft installed). Heavy, verify the block structure can support it.
- Natural stone tiles: Travertine and slate offer texture and slip resistance ($10–$20/sq ft). Seal to prevent staining from grease or marinades.
All countertops should overhang the face of the blocks by 1–2 inches to shed water and hide the structure. Use construction adhesive and masonry screws (countersunk and filled) to anchor countertops.
For countertops over 6 feet long, add a center support pier inside the structure to prevent sagging, especially with concrete or stone. Inspiration for built-in design details can be found in projects showcased by Southern Living, particularly for outdoor kitchens tailored to warm climates.
Conclusion
Cinder block construction delivers a weatherproof, fire-safe outdoor kitchen at a fraction of prefab costs. Whether opting for a minimalist grill station or an L-shaped layout with full amenities, the key is thorough planning, confirming code requirements, calculating materials accurately, and choosing finishes that match both budget and climate. With proper footing, level coursework, and thoughtful details like integrated storage and durable countertops, a DIY cinder block kitchen can serve for decades.