Table of Contents
ToggleThat dusty gap between the top of kitchen cabinets and the ceiling is prime real estate going to waste in most homes. It collects grease, dust, and the occasional lost can of beans, but it doesn’t have to. Decorating above kitchen cabinets transforms dead space into a design feature that pulls the whole room together. Whether the homeowner’s style leans farmhouse, modern, or eclectic, this often-ignored zone offers an opportunity to add personality, height, and polish to the kitchen without breaking out the sledgehammer or calling a contractor.
Key Takeaways
- Decorating above kitchen cabinets fills wasted vertical space, creates visual balance, and gives the kitchen a finished, polished look without construction or contractor costs.
- Faux greenery and baskets are the most practical options, as real plants struggle with poor light and cooking grease, while lightweight materials make styling easier and safer.
- Group decorative objects in odd numbers, vary heights, and layer items for depth—avoid evenly spaced or cluttered arrangements to maintain a curated, home-like appearance.
- Battery-operated LED lights tucked above cabinet tops add ambiance and architectural interest, while warm white bulbs (2700–3000K) create a cozy glow that makes the kitchen feel taller.
- Seasonal rotations of 20–30% of decor items keep the space fresh without major redesign, while also solving dust buildup through regular maintenance.
- Always secure heavy containers with museum putty and use LED-only lighting to prevent safety hazards like toppling objects or fire risks from heat-generating fixtures.
Why Decorate Above Kitchen Cabinets?
First, it’s about visual weight. Standard kitchen cabinets stop at 96 inches or lower, leaving a noticeable gap in rooms with 8-foot or taller ceilings. That empty stripe draws the eye up, and not in a good way. Filling it with intentional decor creates a finished look and makes the ceiling feel higher, not lower.
Second, it’s functional. Not every homeowner needs the storage (or wants to haul out a step ladder for a mixing bowl). Treating the top as display space beats leaving it bare or cramming it with rarely-used items that turn into dust magnets.
Third, it’s an easy, reversible project. No demo, no drywall repair, no permits. Most solutions involve lightweight objects, adhesive strips, or battery-powered lighting, perfect for renters or anyone testing out a look before committing. That said, taller homeowners or those with step stools will have an easier time styling and maintaining the space. If reaching the top means balancing on a wobbly chair, it might not be worth the hassle long-term.
Greenery and Plants for a Fresh Look
Faux greenery is the go-to for above-cabinet decor, and for good reason. Real plants up there face poor light, forgotten watering schedules, and the occasional grease drift from the cooktop. Artificial options from The Kitchn have come a long way, high-quality silk or plastic eucalyptus, ivy, or fern stems look convincing from ground level and won’t wilt.
Arrange greenery in galvanized buckets, ceramic crocks, or tall glass vases to add height variation. Lay loose stems horizontally along the cabinet tops for a casual, garden-inspired feel, or cluster a few containers on one side for asymmetry. Avoid evenly spacing identical arrangements, it reads like a hotel lobby, not a home.
For homeowners who insist on real plants, pothos or snake plants tolerate low light better than most, but they’ll still need watering every 7–10 days. That means dragging out the step stool regularly. Install a small tension rod behind the cabinet face (not visible from below) to hang trailing pothos vines for a lush, cascading effect. Just remember: if it’s hard to reach, it’s hard to maintain.
Safety note: Secure heavy containers with museum putty or adhesive mounting squares to prevent toppling during earthquakes or cabinet door slams. A 5-pound ceramic vase falling from 8 feet can do real damage.
Display Collections and Decorative Objects
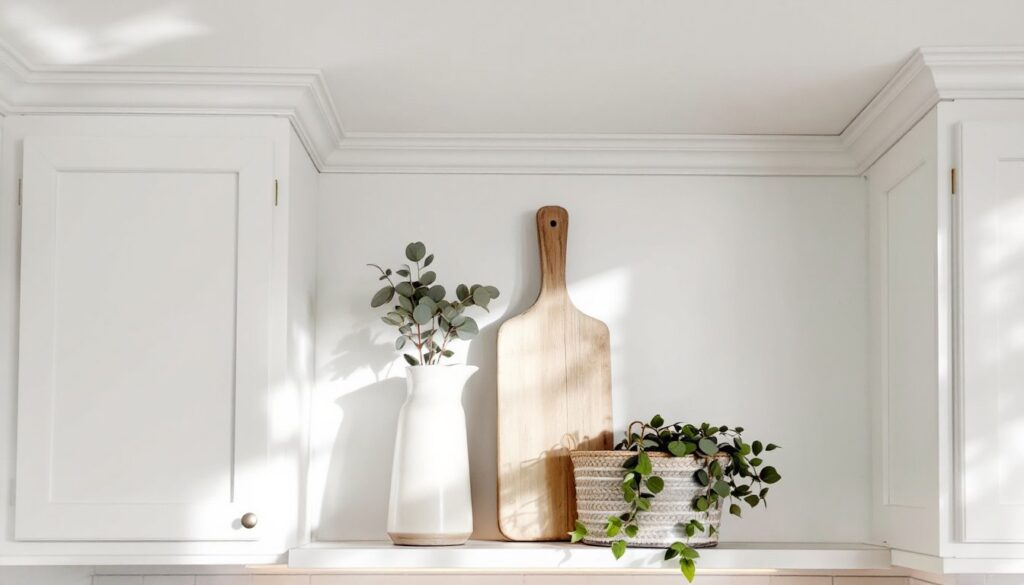
This is where personality shows up. Collections of ironstone pitchers, vintage canisters, wooden cutting boards, or ceramic bowls turn the space into a curated display. The key is editing, too many small objects look cluttered from below, while a few larger pieces (8–12 inches tall) make a statement.
Group items in odd numbers (three, five, seven) and vary the heights. A tall enamelware pitcher next to a squat breadbox next to a leaning cutting board creates visual rhythm. Lean oversized items like antique trays or framed art against the wall for depth instead of laying everything flat. For more ideas on interior styling techniques, homeowners can explore ways to balance color and texture.
Color matters. If the kitchen has white or neutral cabinets, introduce warm wood tones, matte black accents, or soft blues and greens. For dark cabinetry, lighter objects (white ceramics, pale baskets, greenery) provide contrast. Avoid glossy finishes that reflect overhead lighting in distracting ways.
Pro tip: If the cabinet tops are dusty or sticky from cooking residue, lay down a runner of kraft paper or a washable fabric liner first. It makes cleanings faster and protects finishes on vintage or valuable items. Swap it out every few months or after heavy cooking sessions.
Baskets and Texture for Practical Style
Woven baskets are the workhorse of above-cabinet decor. They add texture, warmth, and a farmhouse or coastal vibe without reading too country if styled right. Look for seagrass, rattan, or wire baskets in varying sizes, 12 to 18 inches wide works well for most cabinet depths (standard uppers are 12 or 15 inches deep).
Baskets can sit upright, stacked, or on their sides for different looks. Fill them with rolled dish towels, faux stems, or nothing at all, the texture itself does the work. Mixing basket materials (a wire basket next to a woven seagrass one) keeps it from feeling too matchy. Homeowners exploring fresh approaches might also appreciate <a href="https://tewkesburybc.com/home-refresh-ideas/”>simple home refresh ideas that tie into broader design updates.
For a modern twist, try galvanized metal bins, wooden crates, or rectangular fabric storage boxes in linen or canvas. These read cleaner than wicker but still add dimension. Avoid plastic bins, even neutral ones look cheap from below.
Layering matters. Place a basket at the back, lean a cutting board or small sign in front, tuck in a sprig of greenery. This creates depth and prevents the “catalog shelf” look. Just don’t overcrowd. If it’s hard to tell where one object ends and another begins, pull a few items out.
Lighting Solutions to Add Ambiance
Lighting above cabinets is underrated. It adds drama, highlights decor, and makes the kitchen feel taller and more polished, especially at night. The simplest option is battery-operated LED puck lights or strip lights tucked behind items to create an uplighting effect on the ceiling.
LED strip lights (the kind with adhesive backing) install in minutes. Run them along the rear edge of the cabinet top, facing up. Choose warm white (2700–3000K) for a cozy glow or tunable white for flexibility. Many brands offer remote or app control for dimming. A 16-foot roll typically covers a standard 10×12-foot kitchen and draws minimal power, expect 6–12 months on a set of AA batteries for puck lights, or plug-in options for strips.
For a more decorative approach, small vintage-style Edison bulb string lights or fairy lights can be draped loosely among greenery or baskets. Keep the cord tidy by routing it down the back of a cabinet end or behind the refrigerator to an outlet. Avoid anything that generates heat near combustible materials.
Safety warning: Do not use incandescent bulbs or heat-generating fixtures in enclosed or tight spaces above cabinets. Stick with LED-only options to prevent fire risk. If hardwiring lights, consult a licensed electrician and check local electrical codes (NEC Article 410 covers lighting in dwelling units). For those considering other ambient lighting projects, similar principles apply to under-cabinet or cove lighting installations.
Seasonal and Rotating Displays
Swapping decor seasonally keeps the kitchen feeling current without a full redesign. It’s a low-commitment way to experiment with color, texture, and themes. In fall, add faux pumpkins, copper accents, or dried wheat bundles. Winter calls for evergreen branches, white ceramics, or soft metallics. Spring and summer rotate in lighter colors, pastel pottery, botanical prints, or shells.
The trick is keeping a base layer year-round (baskets, a few evergreen stems, neutral containers) and swapping only 20–30% of the items each season. This prevents the space from looking like a store display that changes every month and makes styling faster. Store off-season decor in clear plastic bins labeled by season, so swapping takes ten minutes, not an hour of digging through closets.
Rotating displays also solve the dust problem. Every time items come down, wipe the cabinet tops and the objects themselves. It’s easier to maintain a space that gets touched every few months than one that sits untouched for years. For homeowners seeking decorating strategies that feel intentional, seasonal swaps add freshness.
Pro tip: Take a photo each time the display is styled. It helps remember what worked and makes restyling next year faster. Over time, a homeowner will develop a collection of go-to arrangements that take the guesswork out.
Conclusion
Decorating above kitchen cabinets doesn’t require a permit, a pro, or a big budget, just a step stool and a plan. Whether the goal is adding greenery, showcasing collections, or installing ambient lighting, the space offers real design potential. Treat it like any other surface in the home: edit ruthlessly, layer thoughtfully, and don’t be afraid to swap things out when they stop working. The ceiling’s not going anywhere, but what sits below it doesn’t have to gather dust anymore.