Table of Contents
ToggleAn outdoor grill kitchen turns a backyard into a year-round entertainment hub. Whether planning a simple grilling station or a fully equipped cooking zone, the right setup eliminates trips back and forth to the indoor kitchen while creating a natural gathering spot. Unlike basic patio grills, a well-designed outdoor kitchen combines function, durability, and style, making it easier to host cookouts, family dinners, or casual weeknight meals outside. From budget-conscious DIY builds to high-end installations with built-in appliances, these ideas help homeowners design a space that fits their cooking style, lot size, and climate.
Key Takeaways
- An outdoor grill kitchen requires four essential elements—grill, prep space, storage, and water access—to function as a true cooking zone rather than just a patio with a grill.
- Choose your layout (L-shaped, U-shaped, or straight-line) based on lot size and traffic flow; outdoor grill kitchen ideas range from budget DIY projects under $600 to premium installations exceeding $30,000.
- Invest in weather-resistant materials like stainless steel (304 grade), marine-grade polymer cabinets, granite or concrete countertops, and pressure-treated wood to ensure your outdoor kitchen withstands UV, rain, and temperature extremes.
- Plan utilities early by sketching gas, water, and electrical lines before construction; most jurisdictions require permits for permanent structures, and gas lines must be installed by licensed plumbers.
- DIY builds with cinder blocks, metal studs, and cement board offer cost savings of 40–60% compared to contractor installation, but always pour a level concrete pad foundation to prevent settling.
- Enhance functionality with strategic upgrades like side burners, outdoor refrigeration, and low-voltage LED lighting, while positioning your grill to direct smoke away from seating areas and neighboring properties.
Essential Elements of a Functional Outdoor Grill Kitchen
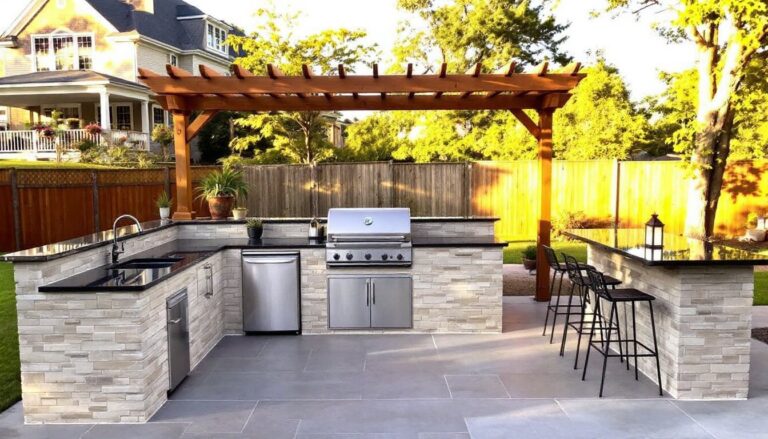
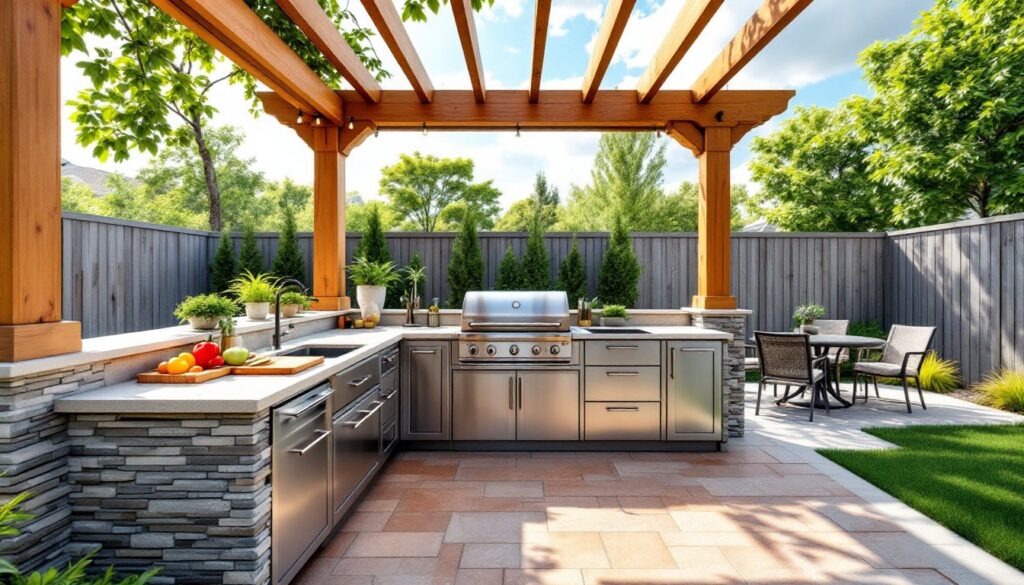
A working outdoor kitchen starts with four core components: the grill, prep space, storage, and a sink or water access. Without these, the space becomes a glorified patio with a grill.
The grill is the centerpiece. Gas grills offer convenience and precise heat control, while charcoal delivers flavor purists prefer. Built-in grills typically range from 36 to 48 inches wide: freestanding models start around 24 inches. For serious cooks, a combination setup, gas for weeknight meals, charcoal or wood-fired for weekends, offers flexibility.
Counter space matters more than most DIYers expect. Plan for at least 24 inches of landing area on each side of the grill for plates, tools, and ingredients. Granite, concrete, and tile withstand heat and weather better than wood or laminate.
Storage keeps propane tanks, utensils, and seasonings out of sight. Stainless steel cabinets resist rust, but marine-grade polymer cabinets cost less and won’t corrode in humid climates. Include a drawer for tools and a cabinet tall enough for a standard 20-pound propane cylinder.
A sink with running water eliminates trips indoors. If plumbing is cost-prohibitive, a large cooler with a spigot or a portable hand-wash station works as a stopgap. Local codes may require a backflow preventer if connecting to municipal water, check with your building department before trenching lines.
Layout and Design Styles for Every Backyard
Outdoor kitchens fall into three layout types: L-shaped, U-shaped, and straight-line (galley). The lot size, traffic flow, and existing hardscape dictate which works best.
An L-shaped layout fits corner patios and provides natural work zones, grill on one leg, prep and sink on the other. This setup keeps the cook facing guests while working. It requires roughly 10 by 10 feet of space.
A U-shaped kitchen creates an enclosed workspace ideal for larger backyards. It accommodates multiple cooks and keeps foot traffic outside the cooking zone. Budget 12 by 15 feet minimum: include an opening at least 4 feet wide so the cook doesn’t feel boxed in.
Straight-line kitchens work for narrow yards or against exterior house walls. They’re budget-friendly and easier to roof or cover with an awning. Limit length to 12 feet or less to avoid excessive walking between stations.
For cohesive outdoor living design, consider how the outdoor living spaces connect to patios, decks, and fire pits.
Built-In vs. Freestanding Grill Stations
Built-in grills integrate into masonry or framed structures. They require a concrete slab foundation (minimum 4 inches thick) and are considered permanent installations. Pros: clean lines, custom fit, increases property value. Cons: higher upfront cost, requires permits in most jurisdictions, difficult to relocate.
Freestanding stations include grill carts and modular islands. They sit on existing patios or pavers and don’t require footings. Pros: portable, no permit needed, lower cost. Cons: less weather resistance, limited counter space, can look disjointed.
For homeowners testing the waters, start freestanding. A quality stainless cart with side burners and a small prep surface runs $800–$2,000. Experienced DIYers can frame a simple built-in barbecue island using concrete blocks, metal studs, and a granite remnant counter.
Budget-Friendly DIY Outdoor Kitchen Projects
A functional outdoor kitchen doesn’t require a contractor or a five-figure budget. These projects deliver results without very costly.
Cinder block island: Stack 8 x 8 x 16-inch concrete blocks (no mortar needed for a non-permanent build) to create a U-shaped base. Cap with 2-inch-thick concrete pavers or a butcher-block countertop sealed with marine spar varnish. Total cost: $300–$600 depending on counter choice. Drop in a freestanding grill and add hooks for utensils.
Pallet wood bar: Disassemble heat-treated pallets (stamped HT, not chemically treated) and reframe them into a rustic outdoor bar with a built-in cooler well. Line the cooler cavity with galvanized sheet metal. Seal all wood with exterior stain or polyurethane. Cost: under $150 if pallets are free. Pairs well with a standalone grill nearby.
Metal stud frame with cement board: Frame an island using 3.625-inch metal studs (won’t rot like wood), sheathe with 1/2-inch cement board, and finish with stacked stone veneer or stucco. Set a drop-in grill into a granite or tile countertop. Budget $800–$1,500 including the grill. This method is code-compliant in most areas and withstands weather better than wood framing.
Repurposed furniture: An old dresser or sideboard can become a prep station. Remove drawers, reinforce the frame, add a stainless steel worktop, and mount a paper towel holder and hooks. Apply exterior paint or sealer. Cost: $50–$200 depending on the base piece. Not suitable for placing a grill directly on it due to heat, but excellent for staging food and supplies.
All DIY builds benefit from a level base. Pour a 4-inch concrete pad or lay a compacted gravel bed topped with pavers to prevent settling. Safety note: wear work gloves, safety glasses, and a dust mask when cutting cement board or stone veneer.
Premium Features to Elevate Your Cooking Space
Once the basics are covered, these upgrades enhance both function and ambiance.
Side burners add a 10,000–15,000 BTU cooking surface for sauces, sides, or a pot of chili. Natural gas models require a licensed plumber to run a line and install a quick-disconnect fitting. Propane versions connect to the same tank as the grill via a splitter valve.
Outdoor refrigerators eliminate cooler refills. Look for units rated for outdoor use with stainless steel exteriors and sealed backs to resist moisture. Standard models hold 4–6 cubic feet: budget $800–$2,500. Compact beverage centers start around $500 and keep drinks cold without taking up full fridge space.
Pizza ovens are surging in popularity. Wood-fired models (like those featured on Remodelista) reach 800°F and cook a pizza in 90 seconds. Gas versions heat faster and maintain consistent temps. Freestanding models sit on a countertop: built-in versions require a reinforced base and chimney clearance per manufacturer specs.
Rotisserie kits turn a standard grill into a spit-roasting machine. Ensure the grill has a dedicated rotisserie burner on the back wall for even heat. A 20-pound motor handles chickens and small roasts: upgrade to 50 pounds for larger cuts.
Lighting extends usability after sunset. Install low-voltage LED strips under counters and inside cabinets. Add a pendant or lantern-style fixture above the grill (rated for wet locations, minimum 7 feet clearance from the cooking surface). For an elegant touch, many homeowners integrate these elements into premier outdoor living designs.
Outdoor-rated electrical outlets (GFCI-protected, weatherproof covers) power blenders, speakers, and chargers. National Electrical Code (NEC) requires outlets within 6 feet of a sink to have GFCI protection. This work needs a licensed electrician in most jurisdictions.
Materials and Finishes That Withstand the Elements
Outdoor kitchens face UV, rain, freezing temps, and grease splatters. Choose materials that won’t rot, rust, or fade.
Countertops: Granite and concrete are the workhorses. Granite remnants (leftover pieces from indoor projects) cost $40–$60 per square foot installed and resist stains and heat. Poured or precast concrete counters run $50–$100 per square foot: seal annually with a penetrating sealer to prevent moisture damage. Tile is budget-friendly ($15–$40 per square foot) but grout lines collect grime, use epoxy grout for easier cleaning.
Cabinetry: Stainless steel (304 grade minimum) won’t corrode, but shows fingerprints and dents. Marine-grade polymer (often sold as HDPE outdoor cabinets) resists rust and insects, costs less, and comes in multiple colors. Avoid standard indoor cabinets, even “water-resistant” plywood will delaminate outdoors.
Framing and structure: Concrete block, poured concrete, and steel framing outlast wood. If using wood framing for a roof or pergola, choose pressure-treated lumber rated for ground contact (look for a 0.40 retention level stamp) or naturally rot-resistant species like cedar or redwood. Apply a water-repellent sealer every 2–3 years.
Veneers and siding: Stacked stone veneer (natural or manufactured) adds texture and hides imperfections. Use a weather-resistant barrier and galvanized metal lath as a base. Stucco over cement board is another durable, low-maintenance option.
Flooring: Extend the patio surface under and around the kitchen. Concrete pavers, porcelain tile (rated for outdoor use), and stamped concrete all handle foot traffic and spills. Avoid natural flagstone with a honed finish, it gets slippery when wet.
Many outdoor kitchen materials mirror those used in other backyard projects, such as outdoor living structures that combine kitchens with pergolas or pavilions.
Planning Your Outdoor Kitchen: Tips for Success
Measure twice, build once. Planning prevents costly mistakes and ensures the finished kitchen actually works for how the household cooks and entertains.
Check local codes and permits: Most jurisdictions require permits for permanent structures, gas lines, and electrical work. Built-in grills often trigger setback requirements, typically 10 feet from property lines and 3 feet from combustible walls. Call the building department early: some areas restrict outdoor cooking appliances due to fire risk.
Plan for utilities: Running gas, water, and electric lines after construction is expensive. Sketch the layout and identify where each utility enters the house. Trench lines before pouring slabs or laying pavers. Gas lines require a licensed plumber in most states. Electrical work must meet NEC standards, hire a licensed electrician unless the homeowner holds the appropriate permits and knows how to pull wire to code.
Account for wind and smoke: Position the grill so prevailing winds carry smoke away from seating areas and neighbor’s yards. If the lot is exposed, a partial privacy wall or windbreak (minimum 6 feet tall) protects burners from gusting out and keeps guests comfortable. For ideas on integrating cooking zones into broader layouts, many homeowners find inspiration when they create outdoor living spaces that balance function with aesthetics.
Consider a roof or cover: A pergola, pavilion, or metal roof keeps rain off the cook and extends the season. Ensure 8-foot minimum clearance above the grill surface: some manufacturers specify greater clearance for warranty compliance. Roofed structures may require engineered plans and frost footings depending on local snow loads.
Test the layout with cardboard: Before buying materials, mock up the kitchen using cardboard boxes cut to appliance dimensions. Walk through the motions, prepping, grilling, plating, and adjust spacing. This low-tech trick catches ergonomic issues early.
Budget for the long haul: Quality outdoor kitchens cost $5,000–$30,000+ depending on size, materials, and appliances. DIYers can cut labor costs by 40–60%, but factor in tool rentals (mixer for concrete, tile saw, etc.) and delivery fees for heavy materials. Build in phases if budget is tight, start with the grill and counter, add the sink and fridge later.
For those seeking design inspiration, platforms like The Kitchn offer layout ideas that translate well to outdoor spaces. Finally, don’t rush the build. Most outdoor kitchen regrets stem from skipping prep work, underestimating material needs, or ignoring manufacturer clearances. Take time to plan, and the result will serve countless meals and gatherings.