Table of Contents
TogglePatios have quietly become the most valuable square footage in many homes, not just for resale value, but for daily living. A well-designed patio extends usable space, provides a mental reset after long days, and serves as a low-stakes testing ground for DIY skills. The difference between a concrete slab with a grill and a genuine outdoor retreat often comes down to intentional design choices, not budget. From zoning strategies to vertical plantings and fire features, these outdoor ideas for patios focus on practical upgrades that deliver measurable impact without requiring a contractor’s license or a teardown.
Key Takeaways
- Outdoor ideas for patios start with breaking the space into defined zones using furniture groupings, low planters, or surface changes to create intentional flow and purpose.
- Vertical gardening and container plants solve space constraints while adding visual interest, with drip irrigation systems keeping maintenance minimal in sunny climates.
- Strategic lighting—combining task lighting, string lights, and low-voltage LED systems—transforms your patio into a functional evening retreat that improves safety and ambiance.
- Outdoor rugs, cushions, and textiles in solution-dyed acrylic or polypropylene fabrics define spaces and add warmth without the maintenance burden of natural fibers.
- Fire features like portable pits or built-in fireplaces extend your patio season and create a natural gathering focal point, provided you verify local fire codes and maintain 10-foot clearance from combustibles.
- Privacy solutions such as pergolas, horizontal slat screens, or living plant walls complete the retreat experience while screening neighbors and reducing noise from adjacent properties.
Create Defined Zones for Dining and Lounging
One of the most effective ways to make a patio feel intentional is to break it into distinct zones. A single, undifferentiated slab reads as unfinished: clear divisions signal purpose and flow.
Start by mapping the space on paper. Measure the patio’s usable dimensions (exclude areas within 18 inches of doors or gates, those are circulation paths). Allocate roughly 60% for dining if meals are a priority, or flip the ratio for lounging if the patio is primarily a reading or conversation space.
Use furniture groupings as the primary divider. A dining table with four to six chairs anchors one zone: a pair of lounge chairs with a side table defines another. Avoid pushing all furniture to the perimeter, floating a seating cluster near the center creates better flow and makes the patio feel larger.
Physical dividers help, too. A low planter box (12–18 inches tall) between zones provides separation without blocking sightlines. Build one from pressure-treated 2×6 or 2×8 lumber: line the interior with landscape fabric and add drainage holes every 12 inches. Alternatively, use a change in surface material, transition from pavers to gravel, or from stamped concrete to an outdoor rug in the seating area.
For narrow patios (less than 10 feet wide), skip heavy furniture and use built-in seating along one edge. A simple bench made from 2×12 cedar planks on 4×4 posts provides seating without eating into floor space. Add cushions for comfort.
If the patio doubles as a path to the yard, ensure at least a 36-inch-wide corridor remains clear. This meets basic accessibility guidelines and prevents bottlenecks during gatherings.
Add Greenery and Vertical Gardens
Plants soften hard surfaces, improve air quality, and provide privacy, but traditional garden beds aren’t always an option on patios. Vertical gardening solves the footprint problem while adding visual interest at eye level.
Vertical structures include trellises, wall-mounted planters, and freestanding plant walls. A basic cedar trellis (4×8 feet) mounted to an exterior wall supports climbing plants like clematis, jasmine, or passion vine. Secure it with 3-inch stainless steel screws into studs or masonry anchors rated for outdoor use. Leave a 2-inch gap between the trellis and the wall to allow air circulation and prevent moisture damage.
For modular flexibility, build a freestanding ladder planter. Use two 8-foot 2×4s as side rails, with 1×6 shelves spaced 12–18 inches apart. Stain or seal the wood with an exterior-grade finish. Place potted herbs, succulents, or trailing plants on each shelf. This setup works well against railings or fences and can be moved seasonally.
Container gardening remains the easiest option. Use pots at least 12 inches in diameter for most perennials and vegetables: smaller pots dry out too quickly in sun and wind. Terracotta breathes but cracks in freezes: resin and fiberglass offer durability without the weight of ceramic. Drill additional drainage holes if needed, waterlogged roots kill more patio plants than underwatering.
Group containers in odd numbers (three or five) for a balanced look, varying heights with plant stands or upturned nursery pots. Pair tall grasses or small shrubs in back with trailing plants like ivy or sweet potato vine in front.
Edible options thrive in containers: cherry tomatoes, peppers, lettuce, and most herbs need 6–8 hours of sun. Use a quality potting mix (not garden soil), and fertilize every two weeks during the growing season with a balanced liquid fertilizer.
Vertical gardens benefit from drip irrigation or self-watering inserts, especially in climates with hot, dry summers. A simple drip line run along the top of a trellis or planter wall reduces watering frequency and keeps foliage dry, minimizing fungal issues.
Upgrade Your Patio Lighting for Ambiance
Lighting transforms a patio from a daytime-only space into a functional evening retreat. Proper lighting also improves safety on steps, edges, and uneven surfaces.
Start with task lighting for dining and cooking zones. A pendant light or chandelier over a dining table (hung 30–36 inches above the surface) provides focused light without glare. Use a weatherproof fixture rated for wet locations (not just damp), check the UL listing. Run wiring through conduit if surface-mounted, or hire a licensed electrician for buried lines. Most jurisdictions require a permit for new outdoor electrical circuits.
For ambient light, string lights remain a cost-effective favorite. Edison-style bulbs on a black wire provide a modern look: globe bulbs feel more casual. Suspend them in a zigzag or grid pattern using screw hooks or eye bolts anchored into fascia boards, posts, or a pergola frame. Space supports every 10–12 feet to prevent sagging. Use outdoor-rated extension cords and keep connections off the ground.
Solar path lights work well for marking edges and steps, but performance varies widely. Look for models with monocrystalline solar panels and replaceable NiMH batteries. Cheaper units with polycrystalline panels dim noticeably in winter or cloudy climates. Install them where they’ll receive at least four hours of direct sun daily.
Low-voltage LED systems (12V) offer more control and consistency than solar. A basic kit includes a transformer, cable, and fixtures. Bury the cable 6 inches deep in a shallow trench or run it along fence lines. Transformers should be plugged into a GFCI-protected outlet and mounted under cover. Aim for 2–3 watts per fixture for path lights, 5–7 watts for uplighting trees or architectural features.
Many homeowners overlook the value of covered outdoor structures when planning lighting, but a pergola or arbor provides natural mounting points for fixtures and helps diffuse light evenly.
Dimmer switches or smart plugs add flexibility, bright light for grilling, softer light for conversation. Motion sensors work well near entry doors but can feel too utilitarian for seating areas.
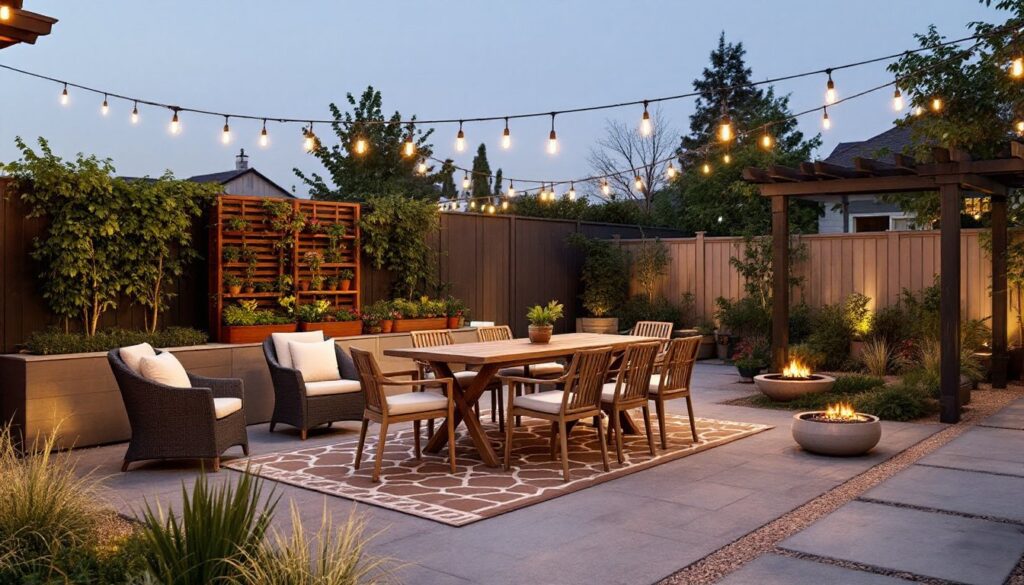
Incorporate Outdoor Rugs and Textiles
Outdoor rugs and textiles define spaces, add color, and provide a warmer underfoot feel than concrete or pavers. They also protect flooring and reduce noise from furniture movement.
Choose rugs labeled outdoor-rated or all-weather. These are typically woven from polypropylene or solution-dyed acrylic, both of which resist UV fading, mold, and mildew. Natural fiber rugs (jute, sisal) absorb moisture and deteriorate quickly outdoors.
Size matters. A dining area rug should extend 24–30 inches beyond the table on all sides so chairs remain on the rug when pulled out. For a lounge zone, the rug should fit entirely under the front legs of sofas and chairs, or under all four legs if space allows. Undersized rugs make spaces feel cramped.
Secure rugs with rug pads designed for outdoor use, these prevent slipping and allow airflow underneath to reduce moisture buildup. On wood decks, use non-staining pads.
Cushions and pillows add comfort and personality. Look for fabrics labeled solution-dyed acrylic (Sunbrella is a common brand) or outdoor polyester blends. These resist water, stains, and UV degradation. Remove them during heavy rain or winter, and store in a dry location, even outdoor fabrics last longer with seasonal care.
For larger seating, consider outdoor sectionals with removable covers. Most covers are machine-washable, which simplifies maintenance. Avoid cheap foam cushions that compress quickly: look for high-density foam (1.8 lbs/cu ft or higher) or polyester-wrapped foam cores.
Outdoor curtains add privacy and soften hard edges on pergolas or covered patios. Use grommeted panels on curtain rods or cable wire. Curtains should be hemmed to stop 1–2 inches above the floor to prevent wicking moisture. Tie them back with hooks or rope during windy conditions.
Textiles introduce seasonal flexibility, swap pillow covers or throws to shift color schemes without replacing furniture. Stores like Better Homes & Gardens regularly feature seasonal outdoor décor ideas that translate well to patios.
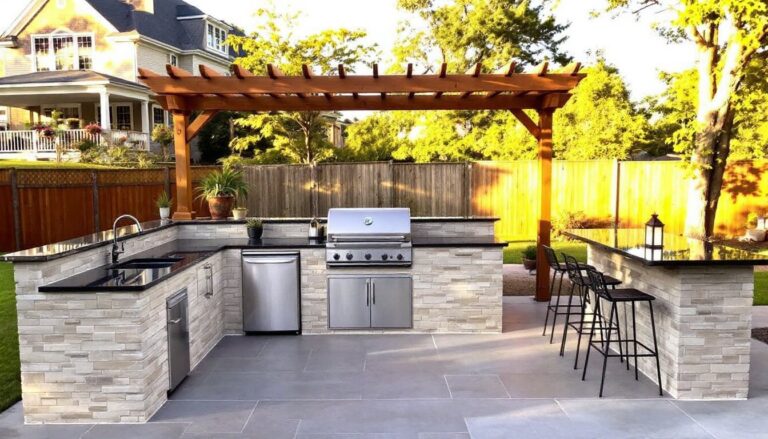
Install a Fire Feature for Warmth and Style
A fire feature extends the patio season into cooler months and provides a natural gathering point. Options range from portable fire pits to built-in fireplaces, each with trade-offs in cost, permanence, and regulation.
Portable fire pits are the simplest entry point. Look for steel or cast iron models with spark screens and stable, wide bases. Wood-burning pits produce smoke and require a supply of seasoned firewood: propane or natural gas models eliminate smoke and offer adjustable flames via a control valve. Gas pits need a 20-pound propane tank (portable) or a hard line to a natural gas supply (permanent). Many municipalities restrict open flames within certain distances of structures, check local fire codes before purchasing.
Built-in fire pits require more planning but integrate seamlessly into the patio design. A common DIY approach uses a steel fire ring (36-inch diameter is standard) surrounded by firebrick and a stone or concrete cap. Dig a shallow pit, add a gravel base for drainage, and stack firebrick in a circle around the ring. Cap the structure with flagstone or cut pavers, leaving a 2–3 inch gap around the ring’s edge. This project suits homeowners comfortable with masonry and basic excavation.
For gas-fueled built-ins, run a black iron gas line or flexible stainless steel connector from the house supply to the pit location. This work typically requires a licensed plumber or gas fitter and a permit. Install a manual shut-off valve within 6 feet of the fire feature for safety. Lava rock or fire glass fills the pit and hides the burner.
Fire tables combine a fire feature with a functional surface. These propane-fueled units include a burner in the center and a surrounding table ledge for drinks or plates. They’re ideal for smaller patios where a standalone pit would consume too much space.
Safety clearances matter. Most manufacturers recommend 10 feet of clearance from combustible materials (wood siding, pergola beams, furniture). Keep a fire extinguisher or garden hose nearby. Avoid using fire features under covered patios unless the structure is specifically rated for it, heat and smoke damage are common.
Fire features pair well with outdoor seating zones, creating a natural focal point that anchors furniture arrangements.
Design a Privacy Solution With Screens or Pergolas
Privacy turns a patio from a visible extension of the house into a retreat. Screens, fences, and overhead structures all contribute, often in combination.
Freestanding privacy screens offer flexibility without permanent installation. Build a simple frame from 4×4 posts and 2×4 cross bracing, then infill with lattice panels, horizontal slats, or corrugated metal. Anchor posts in planters filled with concrete for stability, 50-pound bags of quick-set concrete work well. This approach is ideal for renters or homeowners who want seasonal privacy.
For a more polished look, use horizontal slat fencing. Space 1×6 cedar or composite boards 1–2 inches apart on a 4×4 frame. This style provides partial screening while allowing airflow and light. Stain or seal the wood to prevent weathering.
Living privacy walls take longer to establish but offer a softer aesthetic. Plant privacy-friendly shrubs, arborvitae, boxwood, or bamboo (clumping varieties only: running bamboo is invasive), in a row of large containers or a raised planter bed. Evergreens provide year-round coverage.
Pergolas create privacy from above while defining the patio’s footprint. A basic 10×12-foot pergola uses four 6×6 posts, 2×8 or 2×10 beams, and 2×6 rafters spaced 16–24 inches apart. Anchor posts with post bases bolted to the patio surface or dig 36-inch footings below the frost line if building on soil. Most jurisdictions require a permit for structures over 120 square feet or anything anchored to the house.
Drape the pergola with shade cloth (30–50% density) for UV protection without full enclosure, or train climbing vines like wisteria or grape for seasonal coverage. Retractable canopies add weather protection and flexibility.
Outdoor curtains on a pergola frame provide adjustable privacy, draw them closed for intimate gatherings, tie them back for openness. Use stainless steel cable or curtain rods mounted to the pergola beams.
If the patio adjoins a neighbor’s property, consider sound absorption as well as visual privacy. Combine a solid fence or screen with dense plantings to dampen noise. Materials like deck and patio surfaces can also influence sound reflection.
Always check property lines and setback requirements before installing permanent structures. Many HOAs and municipalities regulate fence height (6 feet is a common residential limit) and placement.
Conclusion
A functional, inviting patio doesn’t require a gut renovation or outsized budget, it requires intentional choices about zoning, materials, and layering. Start with one or two high-impact changes (lighting and seating zones often deliver the best return), then build incrementally. Measure twice, prep surfaces properly, and don’t skip safety steps. Patios reward DIYers who treat them as evolving projects rather than one-and-done installations.