Table of Contents
ToggleA fire pit turns any patio into a year-round gathering space. Whether someone’s hosting weekend cookouts, extending fall evenings outdoors, or simply adding value to their property, a well-placed fire feature changes how a backyard gets used. The options range from simple portable fire bowls to full masonry builds with built-in seating. This guide covers designs, materials, layouts, and the safety considerations that keep a fire pit functional and code-compliant. No fluff, just practical ideas and honest assessments of what each approach requires.
Key Takeaways
- A fire pit extends your patio’s usable season by months and ranks among the top five backyard amenities buyers seek, often returning 60–80% of installation costs at resale.
- Built-in fire pit designs offer durability and design integration, while portable options provide flexibility—choose based on your commitment level, budget, and whether you’re renting or own your home.
- Outdoor patio fire pit ideas range from simple steel fire bowls ($50) to masonry builds and gas-fueled features ($1,500–$4,000), with DIY concrete options available for $150–$300.
- Seating should be positioned 3–5 feet from the fire ring’s edge; plan for at least a 12×12-foot footprint with circular or semicircle arrangements that accommodate 6–8 people comfortably.
- Always maintain code-mandated clearances (typically 10 feet from structures, 3 feet from combustibles, and 21 feet of vertical clearance), keep fire extinguishing equipment nearby, and never leave a fire unattended.
Why Add a Fire Pit to Your Patio?
A fire pit extends outdoor living season by months. In moderate climates, a well-positioned fire feature makes patios usable into late fall and early spring, reclaiming square footage that would otherwise sit empty.
Property value sees a measurable bump. Realtors report that outdoor fire features rank among the top five backyard amenities buyers look for, often returning 60–80% of installation cost at resale.
Functionality matters more than aesthetics here. A fire pit creates a natural focal point for seating arrangements, defines zones within a larger patio, and provides ambient light without running electrical lines. It also handles double duty: recreational fires for ambiance and practical heat on cooler nights.
Permit requirements vary by municipality. Many jurisdictions require a permit for permanent, built-in fire pits, especially those using natural gas or propane lines. Portable units under a certain BTU output often fall outside permit requirements, but local fire codes still dictate minimum clearances from structures, property lines, and overhead obstacles. Check with the local building department before breaking ground.
Built-In Fire Pit Designs for a Permanent Outdoor Feature
Built-in fire pits deliver durability and design integration that portable units can’t match. These are permanent installations, typically constructed from masonry, poured concrete, or steel framework with stone veneer.
In-ground fire pits sit flush with the patio surface or slightly recessed. They require excavation, a gravel base for drainage, and a steel fire ring or refractory brick liner. In-ground designs work well on level patios and keep the fire contained below grade, which helps with wind control. Expect to dig 12–18 inches deep, depending on the fire ring diameter. This design pairs well with outdoor living structures that create defined zones.
Above-grade masonry fire pits use concrete block, natural stone, or brick to create a raised fire bowl. A typical design stands 12–16 inches tall with walls 8–12 inches thick. Use heat-resistant mortar rated to 2000°F and line the interior with firebrick or a stainless steel insert. The base should be a 4-inch thick concrete pad reinforced with rebar or welded wire mesh (WWM).
Gas-fueled built-ins offer convenience but require a licensed gas fitter in most areas. A buried gas line runs from the home’s supply or a dedicated propane tank. Gas units eliminate smoke, ash cleanup, and the need to store firewood, but they lack the crackle and aroma of wood fires. Installation costs run $1,500–$4,000 depending on line length and BTU capacity.
All built-in designs need to comply with clearances specified by the International Residential Code (IRC) and local amendments. Typical minimums: 10 feet from structures, 3 feet from property lines, and at least 21 feet of overhead clearance. Many landscape designers incorporate these features into broader premier outdoor living plans.
Portable and DIY Fire Pit Ideas for Flexibility
Portable fire pits suit renters, frequent movers, or anyone testing a layout before committing to a permanent build. They range from $50 fire bowls to $800 designer units with adjustable flame controls.
Steel fire bowls are the simplest option. A basic 30-inch diameter bowl sits on three or four legs, burns wood, and requires no installation. Look for powder-coated steel or Corten steel (weathering steel) that develops a rust patina over time but doesn’t deteriorate. Cheap thin-gauge steel warps after a few seasons, spend the extra $40 for 3–5mm wall thickness.
Cast iron fire pits hold heat longer and resist warping but weigh 80–100 pounds. They’re stable in wind but a bear to move. Cast iron requires seasoning (like a skillet) to prevent rust. Wipe it down with cooking oil after each use.
Propane fire tables combine a fire feature with a functional tabletop. A 20-pound propane tank tucks into the base, and ceramic logs or fire glass sit above a stainless burner. BTU output ranges from 30,000 to 60,000. These work well on covered patios where wood smoke would be a problem.
DIY concrete fire pits offer a middle ground. Using concrete pavers or retaining wall blocks, a homeowner can stack a simple ring in an afternoon. No mortar is required for a temporary design, but a mortared build adds stability. Many designs featured on Better Homes & Gardens show stacked stone arrangements. Use a steel fire ring insert to protect the masonry from direct flame exposure. Total material cost: $150–$300.
Chimineas funnel smoke upward through a chimney, making them a good choice for small patios or areas with close neighbors. Traditional clay models crack in freeze-thaw cycles: cast aluminum versions last longer. Expect a smaller fire and less heat output compared to an open bowl.
Fire Pit Materials: Choosing the Right Look and Durability
Material choice affects both aesthetics and longevity. Not all stone and metal holds up under repeated heating and weather exposure.
Natural stone (flagstone, limestone, sandstone) gives a rustic look but varies in heat tolerance. Limestone can crack or spall when exposed to high heat. Granite and basalt handle heat better. For a fire pit surround, use stone rated for high-temperature applications and avoid river rock, which can trap moisture and explode when heated.
Concrete and concrete block are affordable and versatile. Standard concrete block works for the outer structure, but the interior fire chamber needs refractory concrete or firebrick rated to 2000°F+. Poured concrete can be formed into custom shapes and finished with acid stain, exposed aggregate, or stone veneer.
Brick offers a classic look. Use firebrick (refractory brick) for any surface within 6 inches of the flame. Standard clay brick can crack under thermal stress. Firebrick is denser, heavier, and more expensive, about $3–$5 per brick vs. $0.50–$1 for common brick.
Steel and stainless steel dominate the portable and modern built-in market. Mild steel rusts without a protective coating: look for powder coating or high-temp paint. Corten (weathering) steel forms a stable rust layer that protects the underlying metal. Stainless steel (304 or 316 grade) resists corrosion in coastal or humid climates but costs 2–3× more.
Fire glass and lava rock replace traditional logs in gas fire pits. Fire glass (tempered glass chunks) reflects light and comes in dozens of colors. Lava rock is porous, holds heat, and costs less. Both are inert and won’t produce toxic fumes. A 10-pound bag covers roughly 100 square inches to a depth of 2–3 inches.
Consider region and climate. In freeze-thaw zones, choose materials that drain well and resist cracking. Coastal areas need corrosion-resistant metals and sealed masonry.
Arranging Seating and Layout Around Your Fire Pit
Seating distance matters for comfort and safety. The sweet spot is 3–5 feet from the fire ring’s edge. Closer than 3 feet gets uncomfortably hot: farther than 5 feet loses the warmth and ambiance.
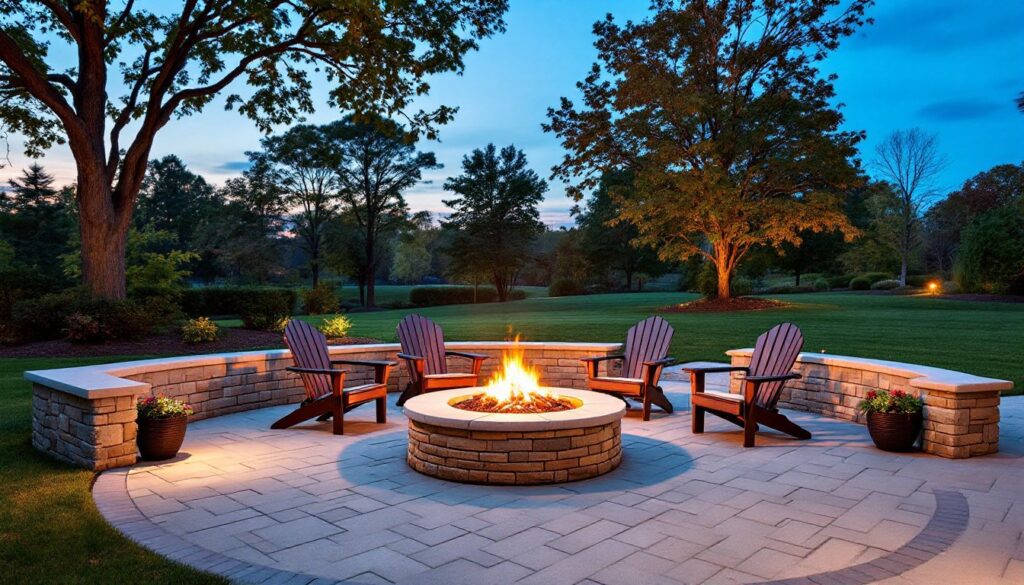
Circular arrangements are traditional and promote conversation. Use built-in stone benches, Adirondack chairs, or a mix of seating types. For a 36-inch diameter fire pit, an 8–10 foot diameter seating circle accommodates 6–8 people comfortably.
Semicircle or L-shaped layouts work when the fire pit backs up to a wall, fence, or landscape feature. This setup suits smaller patios and keeps foot traffic on one side.
Built-in seating using the same material as the fire pit creates a cohesive look. Construct seat walls 16–18 inches tall and 16–20 inches deep. Cap the walls with bullnose coping or smooth flagstone to prevent sharp edges. Adding outdoor cushions improves comfort on masonry seats.
Movable furniture offers flexibility. Adirondack chairs, Muskoka chairs, or teak benches can be rearranged based on group size and wind direction. Anchor light furniture with weights or stakes on windy sites.
Patio size and placement: A fire pit setup needs at least a 12×12-foot footprint for safe clearances and comfortable seating. Position the fire pit away from overhead branches, eaves, pergola beams, and awnings. Sparks travel farther than most people expect.
Pathways and access: Leave a 3-foot-wide path for access and egress. Guests need to exit quickly if wind shifts or someone’s chair gets too hot. Integrate the layout with broader outdoor living plans that consider traffic flow.
Wind and smoke management: Prevailing wind direction determines where to site the fire pit. Position seating upwind when possible, or use a low wall, hedge, or privacy screen to block cross breezes. Articles on Gardenista often highlight landscape buffers that double as windbreaks.
Safety Tips and Maintenance for Patio Fire Pits
Fire pit safety starts before the first match is struck. Neglecting clearances and maintenance invites property damage and injury.
Clearances and site prep: Maintain the minimum distances mandated by local code, typically 10 feet from structures, 3 feet from combustibles (furniture, plants, fencing), and 21 feet of vertical clearance. Clear dead leaves, mulch, and dry grass from a 10-foot radius around the pit. Use a non-combustible patio surface (concrete, stone, pavers, gravel) rather than wood decking. If building on or near a wood deck, install a fireproof mat or deck protector rated for ember containment.
Fire extinguishing equipment: Keep a fire extinguisher (Class A, B, C) within 10 feet and a bucket of sand or a garden hose charged and ready. Never rely on a single method. Sand smothers flames: water can cause steam burns if poured directly onto hot metal or stone.
Safe fuel practices: Burn only seasoned firewood with moisture content below 20% (a moisture meter costs $15–$25). Wet or green wood produces excess smoke and creosote. Avoid pressure-treated lumber, painted wood, plywood, particleboard, and trash, all release toxic fumes when burned. Never use gasoline, lighter fluid, or accelerants to revive a dying fire.
Personal protective equipment (PPE): Use fireproof gloves (welding gloves work) and long-handled fire tools (poker, tongs, shovel) to adjust logs or add fuel. Keep a spark screen or mesh cover over the fire when not actively tending it. Sparks can travel 20+ feet in wind.
Supervision and extinguishing: Never leave a fire unattended. Before heading inside for the night, extinguish completely. Spread coals, douse with water, stir, and repeat until no heat or smoke remains. Touch test: if you can’t hold your hand 6 inches above the ash for 10 seconds, it’s not out.
Gas fire pit safety: Inspect gas lines and connections annually for leaks using soapy water (bubbles indicate escaping gas). Turn off the gas supply at the source when the fire pit isn’t in use. Gas-fueled systems should be installed by a licensed professional to meet National Fuel Gas Code (NFPA 54) and local amendments.
Ash disposal: Let ash cool for 48 hours before disposal. Store cooled ash in a metal container with a tight lid, placed on a non-combustible surface away from structures. Ash can smolder for days.
Seasonal maintenance: Clean out ash and debris after every few uses. Inspect masonry for cracks: seal with high-temp mortar or sealant as needed. Steel fire pits should be covered when not in use or brought under cover in winter. Drain and store gas fire pit components if temperatures drop below freezing to prevent line damage.
Conclusion
A fire pit is one of the most practical upgrades a patio can get. Whether going with a portable steel bowl, a DIY paver ring, or a full masonry build, the project pays back in extended outdoor season and increased property appeal. Prioritize clearances, choose materials suited to local climate, and plan seating layouts that balance comfort with safety. Get the basics right, and the fire pit becomes the backyard’s anchor point for years to come.