Table of Contents
TogglePatio walls aren’t just boundaries, they’re blank canvases waiting to define your outdoor living area. Whether you’re screening out nosy neighbors, adding visual interest, or creating zones within a larger yard, the right wall treatment can turn a basic slab into an extension of your home. Most homeowners focus on furniture and plantings but overlook the vertical real estate that frames the entire space. That’s a missed opportunity. With the right approach, from living greenery to strategic lighting, patio walls can solve functional problems while adding serious style. Here are twelve ideas that work in real-world conditions, not just on Pinterest.
Key Takeaways
- Outdoor patio wall ideas transform blank surfaces into functional focal points that add visual interest, define space, and improve comfort through privacy, wind reduction, and thermal benefits.
- Living walls and vertical gardens deliver high-impact greenery with proper structural backing, waterproofing, and climate-appropriate plant selection, though they require regular watering and maintenance.
- Metal art, exterior murals, and textured finishes like board-and-batten or stucco create durable visual statements when you use outdoor-rated materials, proper primers, and protective sealers.
- Strategic lighting—from sconces and LED strips to string lights—transforms patio walls into evening focal points while enhancing texture and plantings without surface clutter.
- Privacy screens using laser-cut panels, slatted wood, lattice, or outdoor curtains maintain airflow and visual interest while providing separation and defining outdoor zones.
- Successful patio wall treatments require careful attention to structural compatibility, weatherproof fasteners, drainage, and material durability to ensure long-lasting performance.
Why Your Patio Walls Deserve Attention
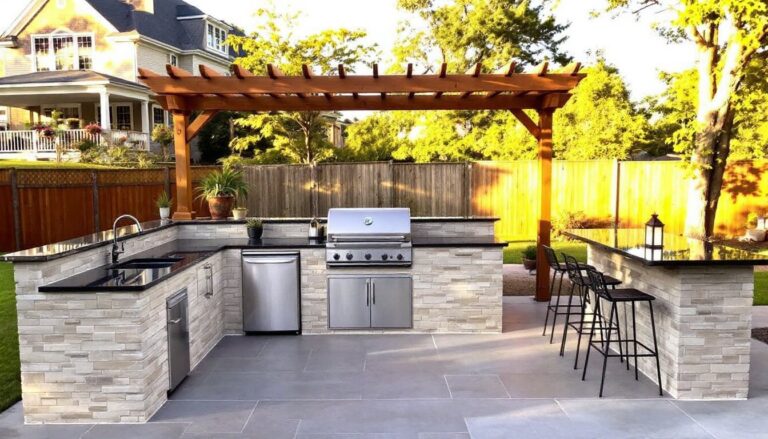
Most patios end up with builder-grade stucco or bare wood fencing that does the job but adds nothing to the experience. That’s fine if you’re just storing trash cans, but a patio is living space, treat it like one.
Walls define scale and proportion. A blank ten-foot expanse of flat surface can make even a well-furnished patio feel unfinished or institutional. Adding texture, color, or function transforms that dead zone into a focal point that anchors furniture arrangements and directs foot traffic.
From a practical standpoint, patio walls also handle heavy lifting: they block wind, reflect heat (or absorb it, depending on material and color), provide privacy, and establish boundaries without sacrificing openness. The right wall treatment won’t just look good in photos, it’ll make the space more comfortable and usable year-round.
Consider structural realities before diving in. Is the wall load-bearing? Does it need weather-resistant finishes? Will you need to drill into masonry or attach framing to studs? For masonry walls (brick, CMU, stucco), use tapcon screws or masonry anchors rated for outdoor exposure. For wood-framed walls, locate studs with a stud finder and use galvanized or stainless fasteners to avoid rust bleed. If you’re modifying an exterior wall of the home itself, check local codes, some jurisdictions require permits for structural penetrations or changes to fire-rated assemblies.
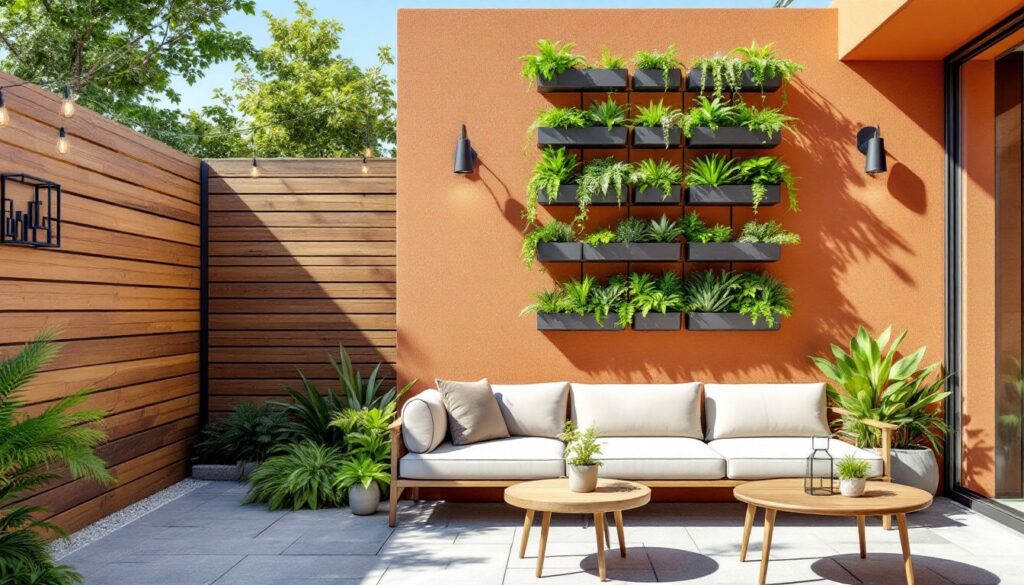
Vertical Gardens and Living Walls
Living walls pack serious impact per square foot. Instead of hanging a single potted fern, a grid of planters or a modular green wall system turns the entire surface into a lush, three-dimensional garden. They also help cool the space through evapotranspiration and can reduce ambient noise if you’re near a street.
Modular pocket planters are the easiest entry point. These fabric or plastic grids hang from hooks or mount to furring strips and hold dozens of small plants in individual cells. Succulents, ferns, and trailing plants like pothos work well. Make sure the backing wall can handle moisture, seal wood or stucco with exterior-grade primer and waterproof membrane behind the planter to prevent rot or efflorescence.
For a more permanent installation, living wall systems use integrated irrigation and drainage. These typically include a powder-coated metal frame, water-resistant backer board, growing medium (often felt or coconut coir), and drip lines connected to a timer. Expect to spend a weekend on installation if you’re handy with basic plumbing and framing. Most systems require a hose bib or exterior spigot nearby: if you don’t have one, hire a plumber to add a frost-proof sillcock.
Plant selection matters. Choose species suited to your wall’s sun exposure and local climate zone. Full-sun walls in hot climates do well with sedums, hens-and-chicks, and ornamental grasses. Shaded north-facing walls are better for hostas, ferns, and ivy. Avoid invasive species like English ivy on wood structures, it’ll work under siding and cause moisture problems.
Maintenance isn’t trivial. Living walls need weekly watering (or automated drip irrigation), periodic fertilizing, and annual replanting of dead or overgrown specimens. If that sounds like too much, consider a simpler trellis with climbing vines, you get greenery with far less fuss.
Statement Art and Outdoor Murals
Outdoor-rated art can turn a boring fence or stucco wall into a conversation starter. Metal sculptures, ceramic tiles, and murals all hold up to weather if you use the right materials and fasteners.
Metal wall art, think laser-cut steel panels, wrought iron medallions, or powder-coated aluminum geometric designs, handles sun and rain without fading. Mount with stainless or galvanized lag bolts into studs or masonry anchors. Leave a 1/4-inch gap between the art and the wall for airflow to prevent moisture trapping and rust staining.
For murals or painted designs, surface prep is everything. Clean the wall with a pressure washer (1,500–2,000 PSI for masonry, lower for wood to avoid damage) and let it dry completely. Prime with a high-quality exterior masonry primer or bonding primer for slick surfaces. Use 100% acrylic exterior paint, it flexes with temperature changes and resists UV breakdown better than latex. If you’re not confident with a brush, use a projector to trace your design at night, then fill in during daylight.
Sealing is critical. After the paint cures (usually 48 hours), apply two coats of clear exterior polyurethane or masonry sealer to lock out moisture and UV. Reapply every 2–3 years depending on sun exposure. Many designers recommend products used for outdoor living structures to ensure long-term durability.
Outdoor-rated tile is another option, especially for Mediterranean or Spanish Revival styles. Cement backer board or an existing stucco surface works as a substrate. Use polymer-modified thinset mortar rated for exterior use and freeze-thaw cycles. Grout with sanded, polymer-modified grout and seal with a penetrating grout sealer to prevent staining and water infiltration. Tiles add weight, make sure your wall structure can handle the load, especially on wood-framed privacy fences.
Textured Wall Treatments and Materials
Flat paint and smooth stucco are safe, but texture adds depth and hides imperfections. Several treatments work well outdoors and don’t require advanced skills.
Board-and-batten cladding gives a clean, modern farmhouse look. Use 1×4 or 1×6 nominal pine or cedar boards (actual dimensions 3/4″ x 3.5″ or 3/4″ x 5.5″) for the verticals, with 1×2 battens covering the seams. Space boards evenly, typically 8 to 12 inches on center. Attach to studs or furring strips with galvanized finish nails or trim screws. Prime all sides before installation to prevent cupping, then finish with two coats of exterior acrylic or oil-based paint. For a weathered look, skip paint and use naturally rot-resistant cedar or treated lumber, applying a clear UV-resistant sealer every two years.
Stucco or render textures add Old-World charm. If you have an existing stucco wall, refresh it with a skim coat in a contrasting color or apply a heavy knockdown or Spanish lace texture using an exterior texture compound. Rent a hopper gun and air compressor for large areas. Practice on scrap plywood first, texture is unforgiving. According to Gardenista’s hardscaping guide, textured finishes on low patio walls create visual interest while maintaining durability.
Stone veneer delivers a high-end look without the cost or structural requirements of full-thickness stone. Manufactured stone veneer (cultured stone) is lighter and easier to install than natural stone. Apply a weather-resistant barrier (WRB) and metal lath to the substrate, then use Type S mortar to adhere veneer pieces. Work from the bottom up, using spacers for consistent joints if desired, or go for a dry-stack look with tight joints. Finish with mortar grout and a breathable masonry sealer.
Horizontal wood slat screens offer a contemporary vibe and semi-privacy. Rip 1x4s or 1x6s, space them 1 to 3 inches apart on a frame of 2×4 pressure-treated lumber, and mount the frame to posts set in concrete footings or bolted to an existing structure. Horizontal lines make spaces feel wider: verticals add height. Seal or stain with a penetrating exterior wood finish to slow weathering.
Lighting Solutions That Double as Decor
Lighting turns a daytime patio into a nighttime destination. When integrated into walls, it provides ambient illumination without cluttering surfaces or creating trip hazards.
Sconce fixtures mounted at 60 to 72 inches above the floor cast light up and down, adding drama without glare. Choose fixtures rated for wet or damp locations (check the UL listing). For masonry walls, use a hammer drill with a masonry bit and plastic anchors or tapcons. For wood, hit studs whenever possible. Run wiring through weatherproof conduit (rigid PVC or EMT) if surface-mounted: for concealed runs, you’ll need to fish wire through walls, consider hiring a licensed electrician if you’re not comfortable with the National Electrical Code (NEC) requirements for outdoor wiring.
Low-voltage LED strip lighting offers flexibility. Mount aluminum channels along the top or bottom of walls for indirect lighting that highlights texture and plantings. Use a 12V or 24V outdoor-rated transformer, and keep total run length within the manufacturer’s specs to avoid voltage drop and dimming at the far end. Most strips are dimmable, pair with a compatible smart dimmer for control from your phone.
String lights or cafe lights are the easiest install, hook into eye screws or cable tensioners mounted to the wall, then plug into a GFCI-protected outlet. For a cleaner look, run the cord through PVC conduit painted to match the wall. Consider visiting The Spruce for additional ideas on integrating outdoor lighting into your overall design scheme.
Integrated hardscape lighting, such as recessed step lights or brick lights, works well in low patio walls (pony walls) or planters. These require cutting pockets in masonry or wood, mounting the fixture, and running low-voltage wire. Use a hole saw for wood, and a core bit for brick or concrete. Always install a drip loop where wire exits the wall to prevent water from running into the fixture.
If you’re planning broader upgrades such as an outdoor living room, coordinate lighting with furniture layout to avoid awkward shadows or dark corners.
Privacy Screens and Decorative Panels
Privacy doesn’t have to mean solid walls. Screens and panels provide separation while maintaining airflow and visual interest.
Laser-cut metal panels come in hundreds of patterns, geometric, botanical, abstract, and mount easily to posts or existing walls. Aluminum panels resist rust: steel panels develop a natural patina or can be powder-coated. Mount with stainless standoffs or Z-clips that allow the panel to float 1 to 2 inches off the wall for a shadow effect. These panels work well in modern or industrial-style settings and pair nicely with systems like Barrette outdoor fencing, which offer modular design flexibility.
Slatted wood screens (often called louvered panels) can be angled to block sightlines while letting light through. Build them from 1×3 or 1×4 cedar or redwood, spaced at 45-degree angles in a 2×4 frame. For angled slats, cut dados in the frame rails with a table saw or router, then slide slats into place and secure with exterior wood glue and finish nails. Seal with marine-grade spar varnish or penetrating oil to slow weathering.
Lattice panels, either traditional wood or vinyl, are a budget-friendly option. Standard 4×8-foot sheets run $20–$50 depending on material. Frame them with 1×4 trim for a finished look and mount to posts or wall cleats. Lattice works especially well as a trellis base for climbing plants like clematis or jasmine, creating a layered screen over time.
Gabion walls (wire cages filled with stone) provide privacy, thermal mass, and a sculptural look. These are heavy, expect 100+ pounds per linear foot depending on height and stone type, so they require solid footings. Hire a contractor if you’re building anything over 2 feet tall or if local codes require engineered foundations. Gabions are expensive but virtually maintenance-free.
For a lighter decorative touch, outdoor curtains hung from a wall-mounted rod or cable system add softness and flexibility. Use fabric rated for outdoor use (solution-dyed acrylic like Sunbrella) to resist fading and mildew. Mount rod brackets into studs or use toggle bolts for hollow walls. Curtains won’t provide full privacy but they define zones and add movement.
Conclusion
Patio walls do more than hold up the roof or mark property lines, they set the tone for how the space feels and functions. Whether you’re mounting simple string lights or building a full vertical garden, the key is treating walls as intentional design elements, not afterthoughts. Start with one high-impact upgrade and build from there. For more inspiration, check out Southern Living for regional styles that complement outdoor living projects. The difference between a forgettable patio and one that feels like a true extension of your home often comes down to what’s on the walls.